Dubbo 在 CI 中自动检查错误码 Logger 调用的实现(二) - 通过 Javassist 完成 Logger 类的判断

书接上文。此前讲到了通过常量池结合正则表达式获取所有的错误码。下面主要是判断该如何确定各个类调用的是哪个 Logger,以及如果调用的是 error 和 warn 方法的话,是否正确的使用了带错误码的参数。

判断是否使用正确的日志方法

Javap 的输出

此文仍以上篇文章的org.apache.dubbo.common.DeprecatedMethodInvocationCounter.onDeprecatedMethodCalled(String) 的输出的节选为例。该类在最近在 Dubbo 的主线被删除,请参考参考链接 [1] 中的文件):

1
2
3
4
5
6
7
8
9
10
11
12
13
14
15
16
17
18
19
20
21
22
23
24
25
26
27
28
29
30
31
32
33
34
35
36
37
38
39
40
41
42
43
44
45
46
47
48
49
50
51
52
53
54
55
56
57
58
59
60
61
62
63
64
public final class org.apache.dubbo.common.DeprecatedMethodInvocationCounter
minor version: 0
major version: 52
flags: (0x0031) ACC_PUBLIC, ACC_FINAL, ACC_SUPER
this_class: #41 // org/apache/dubbo/common/DeprecatedMethodInvocationCounter
super_class: #43 // java/lang/Object
interfaces: 0, fields: 2, methods: 7, attributes: 3
Constant pool:
// ...

#5 = Methodref #41.#92 // org/apache/dubbo/common/DeprecatedMethodInvocationCounter.hasThisMethodInvoked:(Ljava/lang/String;)Z
#6 = Fieldref #41.#93 // org/apache/dubbo/common/DeprecatedMethodInvocationCounter.LOGGER:Lorg/apache/dubbo/common/logger/ErrorTypeAwareLogger;
#7 = Class #94 // org/apache/dubbo/common/constants/DeprecatedMethodInvocationCounterConstants
#8 = String #95 // 0-99
#9 = String #96 // invocation of deprecated method
#10 = String #97 //
#11 = Class #98 // java/lang/StringBuilder
#12 = Methodref #11.#88 // java/lang/StringBuilder."<init>":()V
#13 = String #99 // Deprecated method invoked. The method is
#14 = Methodref #11.#100 // java/lang/StringBuilder.append:(Ljava/lang/String;)Ljava/lang/StringBuilder;
#15 = Methodref #11.#101 // java/lang/StringBuilder.toString:()Ljava/lang/String;
#16 = InterfaceMethodref #102.#103 // org/apache/dubbo/common/logger/ErrorTypeAwareLogger.warn:(Ljava/lang/String;Ljava/lang/String;Ljava/lang/String;Ljava/lang/String;)V

// ...

#102 = Class #144 // org/apache/dubbo/common/logger/ErrorTypeAwareLogger
#103 = NameAndType #145:#146 // warn:(Ljava/lang/String;Ljava/lang/String;Ljava/lang/String;Ljava/lang/String;)V

// ...

#144 = Utf8 org/apache/dubbo/common/logger/ErrorTypeAwareLogger
#145 = Utf8 warn
#146 = Utf8 (Ljava/lang/String;Ljava/lang/String;Ljava/lang/String;Ljava/lang/String;)V

// ...

{
public static void onDeprecatedMethodCalled(java.lang.String);
descriptor: (Ljava/lang/String;)V
flags: (0x0009) ACC_PUBLIC, ACC_STATIC
Code:
stack=6, locals=1, args_size=1
0: aload_0
1: invokestatic #5 // Method hasThisMethodInvoked:(Ljava/lang/String;)Z
4: ifne 40
7: getstatic #6 // Field LOGGER:Lorg/apache/dubbo/common/logger/ErrorTypeAwareLogger;
10: ldc #8 // String 0-99
12: ldc #9 // String invocation of deprecated method
14: ldc #10 // String
16: new #11 // class java/lang/StringBuilder
19: dup
20: invokespecial #12 // Method java/lang/StringBuilder."<init>":()V
23: ldc #13 // String Deprecated method invoked. The method is
25: invokevirtual #14 // Method java/lang/StringBuilder.append:(Ljava/lang/String;)Ljava/lang/StringBuilder;
28: aload_0
29: invokevirtual #14 // Method java/lang/StringBuilder.append:(Ljava/lang/String;)Ljava/lang/StringBuilder;
32: invokevirtual #15 // Method java/lang/StringBuilder.toString:()Ljava/lang/String;
35: invokeinterface #16, 5 // InterfaceMethod org/apache/dubbo/common/logger/ErrorTypeAwareLogger.warn:(Ljava/lang/String;Ljava/lang/String;Ljava/lang/String;Ljava/lang/String;)V
40: aload_0
41: invokestatic #17 // Method increaseInvocationCount:(Ljava/lang/String;)V
44: return

// ....
}

以常量池为切入点查找

考虑到错误码 Logger 的接入是以整个类为单位的,我们可以简化成只扫描这个类是否使用了错误码 Logger 类。

据 Java 虚拟机规范 [2]

Java Virtual Machine instructions do not rely on the run-time layout of classes, interfaces, class instances, or arrays. Instead, instructions refer to symbolic information in the constant_pool table.

可知常量池盛装了 .class 文件中所有的符号(比如类的引用)等等。

因此我们只需要查询 .class 文件中间的常量池里头是否存在不符合要求的 Logger 类调用即可。

具体思路

鉴于 Logger 的方法是接口方法,在 JVM 中是使用 invokeinterface 调用的。其接受的常量池的结构体是 InterfaceMethodref。从 JVM 规范可知 InterfaceMethodref 的结构如下 [3]

1
2
3
4
5
CONSTANT_InterfaceMethodref_info {
u1 tag;
u2 class_index;
u2 name_and_type_index;
}
  1. tag是固定值,代表该项常量池项目是接口方法的引用。
  2. class_index 是对应着常量池中接口信息的索引,它对应着我们要调用方法所在的接口。
  3. name_and_type_index 对应着常量池中的 CONSTANT_NameAndType_info 结构的索引,代表方法签名。

因此我们只需要确认 .class 文件里头的所有的 CONSTANT_InterfaceMethodref_info 的内容即可。

Javassist 的实现

我们可以仿照上篇文章的 Javassist 的用法(以下均为org.apache.dubbo.errorcode.extractor.JavassistConstantPoolErrorCodeExtractor#getIllegalLoggerMethodInvocations 这一方法的讲述)[4]

  1. 首先找到 CONSTANT_InterfaceMethodref_info 在 Javassist 中对应的类 javassist.bytecode.InterfaceMethodrefInfo

  2. 通过反射调用 ConstPool.getItem(int) 获得所有的常量池的内容(详见前一篇文章的 JavassistUtils.getConstPoolItems),并通过 Stream 筛选和 map 出所有的 InterfaceMethodrefInfo 的实例所对应的常量池索引:

    1
    2
    3
    4
    5
    6
    7
    8
    9
    10
    11
    12
    13
    14
    15
    16
    17
    18
    19
    20
    21
    22
    private static final Class INTERFACE_METHOD_INFO;

    static {
    try {
    INTERFACE_METHOD_INFO = Class.forName("javassist.bytecode.InterfaceMethodrefInfo");
    } catch (ClassNotFoundException e) {
    throw new RuntimeException(e);
    }
    }

    // ...

    public List<MethodDefinition> getIllegalLoggerMethodInvocations(String classFilePath) {
    List<Object> constPoolItems = JavassistUtils.getConstPoolItems(classFile.getConstPool());

    List<Integer> interfaceMethodRefIndices = constPoolItems.stream()
    .filter(x -> x.getClass() == INTERFACE_METHOD_INFO)
    .map(this::getIndexFieldInConstPoolItems)
    .collect(Collectors.toList());

    // ...
    }

    另附 getIndexFieldInConstPoolItemsReflectUtils.getDeclaredFieldRecursively [5] 的代码:

    1
    2
    3
    4
    5
    6
    7
    8
    9
    10
    11
    12
    13
    // 为了查找出 Javassist 对应的常量池类实例的 index 的 Field,以确定其在常量池的索引。
    private int getIndexFieldInConstPoolItems(Object item) {
    // 鉴于 index 这个 Field 是在 javassist.bytecode.ConstInfo 中定义的。
    // 此处其实可以使用 javassist.bytecode.ConstInfo 所对应的 Class 对象直接获取。
    // 但是原本的写法是从该类一直向父类找 index 这个 Field。
    Field indexField = ReflectUtils.getDeclaredFieldRecursively(item.getClass(), "index");

    try {
    return (int) indexField.get(item);
    } catch (IllegalAccessException e) {
    throw new RuntimeException(e);
    }
    }
1
2
3
4
5
6
7
8
9
10
11
12
13
14
15
16
17
18
public static Field getDeclaredFieldRecursively(Class cls, String name) {
try {
// 本类找得到么?
Field indexField = cls.getDeclaredField(name);
indexField.setAccessible(true);

return indexField;
} catch (NoSuchFieldException e) {
// 到头了
if (cls == Object.class) {
// null 了事。
return null;
}

// 向上找。
return getDeclaredFieldRecursively(cls.getSuperclass(), name);
}
}
  1. 遍历第 2 步所得出的索引,通过 Javassist 的常量池 API 回表查找,同时记录该类所有的方法调用信息:

    1
    2
    3
    4
    5
    6
    7
    8
    9
    10
    11
    12
    13
    14
    15
    16
    17
    18
    19
    20
    21
    22
    23
    24
    25
    26
    27
    28
    29
    30
    31
    32
    33
    34
    35
    // 接上文 getIllegalLoggerMethodInvocations

    List<MethodDefinition> methodDefinitions = new ArrayList<>();

    for (int index : interfaceMethodRefIndices) {
    ConstPool cp = classFile.getConstPool();

    MethodDefinition methodDefinition = new MethodDefinition();
    methodDefinition.setClassName(
    // 确定 invokeinterface 的接口名
    cp.getInterfaceMethodrefClassName(index)
    );

    methodDefinition.setMethodName(
    // 通过常量池索引确定参数名
    cp.getUtf8Info(
    // 获取方法签名名的常量池索引
    cp.getNameAndTypeName(
    // 获取方法签名所在的常量池索引
    cp.getInterfaceMethodrefNameAndType(index)
    )
    )
    );

    methodDefinition.setArguments(
    // 通过常量池索引确定方法名
    cp.getUtf8Info(
    cp.getNameAndTypeDescriptor(
    cp.getInterfaceMethodrefNameAndType(index)
    )
    )
    );

    methodDefinitions.add(methodDefinition);
    }

    另提供 MethodDefinition 类供参考(部分内容通过注解省略。源代码并没用 Lombok。)[6]

    1
    2
    3
    4
    5
    6
    7
    8
    @Data
    @NoArgsConstructor
    @AllArgsConstructor
    public class MethodDefinition {
    private String className;
    private String methodName;
    private String arguments;
    }
  2. 通过比对调用的方法的类和方法签名来确定是否满足需求。鉴于合符要求的错误码 Logger 的 warn 和 error 调用至少要四个参数,所以只需要确定调用那两个方法的参数个数即可。

    1
    2
    3
    4
    5
    6
    7
    8
    9
    10
    11
    12
    13
    14
    // 接上文 getIllegalLoggerMethodInvocations

    // 确定是否是日志类的方法调用
    Predicate<MethodDefinition> legacyLoggerClass = x -> x.getClassName().equals("org.apache.dubbo.common.logger.Logger");
    Predicate<MethodDefinition> errorTypeAwareLoggerClass = x -> x.getClassName().equals("org.apache.dubbo.common.logger.ErrorTypeAwareLogger");
    Predicate<MethodDefinition> loggerClass = legacyLoggerClass.or(errorTypeAwareLoggerClass);

    return methodDefinitions.stream()
    .filter(loggerClass)
    // 确定是否 warn, error
    .filter(x -> x.getMethodName().equals("warn") || x.getMethodName().equals("error"))
    // 若是 warn 和 error 级别则确定参数是否小于四个,如果是则代表没有挂上错误码。
    .filter(x -> x.getArguments().split(";").length < 4)
    .collect(Collectors.toList());
  3. 通过返回的值确定哪些类里头调用了没有错误码的 Logger 调用。

以方法调用为切入点查找

问题

上述通过判定类常量池的做法虽然可以确定哪个类调用了哪些不符合要求的 Logger 方法调用,但是维护者也需要定位到具体是是哪个方法没有调用到合符要求的 Logger 方法。因此在这里需要以方法调用为切入点查找 Logger 调用。

具体思路

遍历方法

首先我们需要遍历所有方法(通过 ClassFile.getMethods()),并确定 .class 文件中每个方法的具体代码的位置。据 JVM 规范 [7].class 文件中,方法的具体实现是存放到每个方法的属性表中的 Code 属性,所以在 Javassist 中应使用 Class File API 获取每个方法的 Code 属性(即 getCodeAttribute()),因此有:

1
2
3
4
5
6
7
8
9
10
11
12
13
ClassFile classFile = JavassistUtils.openClassFile("...");
ConstPool cp = classFile.getConstPool();

for (MethodInfo methodInfo : classFile.getMethods()) {
CodeAttribute codeAttribute = methodInfo.getCodeAttribute();

if (codeAttribute == null) {
// 没有具体实现(抽象方法等),跳过。
continue;
}

// ...
}

拿到 Code 属性之后,遍历每条指令,直到 invokeinterface 出现就开始比对。

那么怎么遍历每条指令呢?

Javassist 的方法的字节码指令的遍历 API

这个时候我们可以使用 CodeIterator 来遍历每一条字节码,而这个对象可以通过 CodeAttribute.iterator() 获取。

CodeIterator 的用法与迭代器 Iterator 相似(但不是 Iterator 的实现类),都是使用 hasNext 方法确定是否还有字节码,next 方法拿到下一个字节码指令的字节相对于 Code 属性表最开始的指令的偏移量。byteAt 方法可以拿到偏移量所在位置对应的字节。

题外话:为什么是 Code 表的偏移量?

Code of creating CodeIterator (R7.3.9)

Part of implementation of CodeIterator (R7.3.9)

  1. .class 文件中,Code 是方法的属性。
  2. 在获取 CodeIterator 的 CodeAttribute.iterator() 中,调用了 CodeIterator 的构造方法,这个构造方法获取了 CodeAttribute 的 info 这一 Field (即 Code 属性表的原始字节码),并赋值给 CodeIterator.byteCode 属性。
  3. 通过 byteAt 方法可知它读取了 byteCode 数组,下标是给定的 index,因此可以看出 index 是相对于 Code 表的偏移量,而非相对于字节码文件的偏移量。

在 Javassist 中有一个数组可以用来对应指令名称和指令的字节码的表示,为 Mnemonic.OPCODE 。我们可以用它比对指令的名称。[8] (此处也可以通过直接比对具体指令的字节以提高效率。)

鉴于抽象方法没有 Code 属性表 [7],因此需要通过判断排除这类方法以防 NPE。

整合上述思路并用代码表示,如下:

1
2
3
4
5
6
7
8
9
10
11
12
13
14
15
16
17
18
19
20
21
22
23
24
25
26
27
28
ClassFile classFile = JavassistUtils.openClassFile("...");
ConstPool cp = classFile.getConstPool();

for (MethodInfo methodInfo : classFile.getMethods()) {
CodeAttribute codeAttribute = methodInfo.getCodeAttribute();

if (codeAttribute == null) {
// 没有具体实现(抽象方法等),跳过。
continue;
}

CodeIterator codeIterator = codeAttribute.iterator();

while (codeIterator.hasNext()) {
// 获取下一条指令的索引
int index = codeIterator.next();
// 确定具体指令
int op = codeIterator.byteAt(index);

// 此处可以使用
// op == 185
// 来提高效率(直接比较它对应的指令字节)
if ("invokeinterface".equals(Mnemonic.OPCODE[op])) {

// 当指令是 invokeinterface,...
}
}
}

Invokeinterface 的具体参数的获得

为了进一步确定接下来的行为,我们不妨参考下 JVM 规范中 invokeinterface 指令的参数 [9]

P525 - Arguments of invokeinterface (R7.3.5)

不难看出调用的接口方法的方法签名(即 CONSTANT_InterfaceMethodref_info)的常量池索引是 (indexbyte1 << 8) | indexbyte2 这一表达式的结果。且 indexbyte1 就在 invokeinterface 这一指令的字节码的下一个字节。故有:

1
2
3
4
5
6
7
// 前略。
if ("invokeinterface".equals(Mnemonic.OPCODE[op])) {
// Indexbyte part of invokeinterface opcode.

int interfaceMethodConstPoolIndex =
codeIterator.byteAt(index + 1) << 8 | codeIterator.byteAt(index + 2);
}

再依照“以常量池为切入点查找”一节的办法拿到具体方法签名,并通过 MethodInfo.toString() (或者 MethodInfo.getName()MethodInfo.getDescriptor())获取发起调用的方法的签名,再做好记录,做好记录全部实现如下:

1
2
3
4
5
6
7
8
9
10
11
12
13
14
15
16
17
18
19
20
21
22
23
24
25
26
27
28
29
30
31
32
33
34
35
36
37
38
39
40
41
42
43
44
45
46
47
48
49
50
51
52
53
54
55
56
57
58
59
ClassFile classFile = JavassistUtils.openClassFile("...");

ConstPool cp = classFile.getConstPool();

Map<String, List<MethodDefinition>> methodDefinitions = new HashMap<>();

for (MethodInfo methodInfo : classFile.getMethods()) {
CodeAttribute codeAttribute = methodInfo.getCodeAttribute();

if (codeAttribute == null) {
// No detailed implementation, just skip!
continue;
}

CodeIterator codeIterator = codeAttribute.iterator();

while (codeIterator.hasNext()) {
int index = codeIterator.next();
int op = codeIterator.byteAt(index);

if ("invokeinterface".equals(Mnemonic.OPCODE[op])) {

// IndexByte part of invokeinterface opcode.

int interfaceMethodConstPoolIndex =
codeIterator.byteAt(index + 1) << 8 | codeIterator.byteAt(index + 2);

String initiateMethodName = methodInfo.toString();

MethodDefinition methodDefinition = new MethodDefinition();

methodDefinition.setClassName(
cp.getInterfaceMethodrefClassName(interfaceMethodConstPoolIndex)
);

methodDefinition.setMethodName(
cp.getUtf8Info(
cp.getNameAndTypeName(
cp.getInterfaceMethodrefNameAndType(interfaceMethodConstPoolIndex)
)
)
);

methodDefinition.setArguments(
cp.getUtf8Info(
cp.getNameAndTypeDescriptor(
cp.getInterfaceMethodrefNameAndType(interfaceMethodConstPoolIndex)
)
)
);

methodDefinitions.computeIfAbsent(initiateMethodName, k -> new ArrayList<>());
methodDefinitions.get(initiateMethodName).add(methodDefinition);
}
}
}

// 对于此处的 methodDefinitions:
// Key 是这个 .class 文件中的方法,Value 是这个方法发起的所有调用。

若要筛选出不合格的 Logger 方法调用,只需要筛选 methodDefinitions 这一结果,或在遍历方法调用指令之时完成筛选即可。

以上解决了如何获取所有的 Logger 方法的调用的问题。但是,一个新需求到来 —— 确定不合格的 Logger 调用所在的行号。该怎么办呢?还请看下回分解。


备注:

  1. 有关环境:

    (a) 命令行 Maven 运行于 OpenJDK 19 (本文初稿时)22(重新整理时)环境下。

    (b) 对于 Dubbo 项目 IDEA JDK 配置为基于 OpenJDK 8 的 GraalVM 21.3.1 的 JDK。

    (c) 在编写错误码 Logger 调用自动检测程序时,使用的是 OpenJDK 19 版本,但调节了兼容性设置到 JDK 8。

    (d) 在 Dubbo CI 运行时使用 Azul OpenJDK 17。

  2. 本文写作时的 JDK 的最新版本为 21 (本文初稿时)23(重新整理时),本文所有的有关 JDK 的参考文献均以该版本为参考。


引用和参考:

[1] Apache Dubbo Source Code - org.apache.dubbo.common.DeprecatedMethodInvocationCounter

https://github.com/apache/dubbo/blob/5ae875d951d354a2f2d3316fc08cab406a3e947e/dubbo-common/src/main/java/org/apache/dubbo/common/DeprecatedMethodInvocationCounter.java

[2] Java Virtual Machine Specification - Chap. 4 - Constant Pool section

https://docs.oracle.com/javase/specs/jvms/se23/html/jvms-4.html#jvms-4.4

[3] Java Virtual Machine Specification - Chap. 4 - The ‘CONSTANT_Fieldref_info’, ‘CONSTANT_Methodref_info’, and ‘CONSTANT_InterfaceMethodref_info’ Structures and Static Constraints section

https://docs.oracle.com/javase/specs/jvms/se23/html/jvms-4.html#jvms-4.4.2

[4] Apache Dubbo Error Code Inspector Source Code (in dubbo-test-tools) - org.apache.dubbo.errorcode.extractor.JavassistConstantPoolErrorCodeExtractor

https://github.com/apache/dubbo-test-tools/blob/main/dubbo-error-code-inspector/src/main/java/org/apache/dubbo/errorcode/extractor/JavassistConstantPoolErrorCodeExtractor.java

[5] Apache Dubbo Error Code Inspector Source Code (in dubbo-test-tools) - org.apache.dubbo.errorcode.util.ReflectUtils

https://github.com/apache/dubbo-test-tools/blob/main/dubbo-error-code-inspector/src/main/java/org/apache/dubbo/errorcode/util/ReflectUtils.java

[6] Apache Dubbo Error Code Inspector Source Code (in dubbo-test-tools) - org.apache.dubbo.errorcode.model.MethodDefinition

https://github.com/apache/dubbo-test-tools/blob/main/dubbo-error-code-inspector/src/main/java/org/apache/dubbo/errorcode/model/MethodDefinition.java

[7] Java Virtual Machine Specification - Chap. 4 - The Code Attribute section

https://docs.oracle.com/javase/specs/jvms/se23/html/jvms-4.html#jvms-4.7.3

[8] Javassist API Docs - javassist.bytecode.Mnemonic

https://www.javassist.org/html/javassist/bytecode/Mnemonic.html

[9] Java Virtual Machine Specification - Chap. 4 - invokeinterface section

https://docs.oracle.com/javase/specs/jvms/se23/html/jvms-4.html#jvms-4.10.1.9.invokeinterface (Page 525 in the PDF version.)


[ TART - Dubbo (ECI) - T3 - R5,6,7 ] (Mainly @FB (M))

(SNa - ECI, SNu - 2)

Dubbo 在 CI 中自动检查错误码 Logger 调用的实现(一) - 背景和错误码的获取

背景

众所周知,Dubbo 在 3.1 版本中引入了错误码机制。在此摘抄一部分(我写的 =_= )介绍文档如下 [1]

背景

Dubbo 内部依赖的 Logger 抽象层提供了日志输出能力,但是大部分的异常日志都没有附带排查说明,导致用户看到异常后无法进行处理。

为了解决这个问题,自 Dubbo 3.1 版本开始,引入了错误码机制。其将官方文档中的错误码 FAQ 与日志框架连接起来。在日志抽象输出异常的同时附带输出对应的官网文档链接,引导用户进行自主排查。

错误码格式

[Cat]-[X]

两个空格均为数字。其中第一个数字为类别,第二个数字为具体错误码。

Logger 接口支持

为确保兼容性,Dubbo 3.1 基于原本的 Logger 抽象,构建了一个新的接口 ErrorTypeAwareLogger

warn 等级的方法进行了扩展如下

1
2
void warn(String code, String cause, String extendedInformation, String msg);
void warn(String code, String cause, String extendedInformation, String msg, Throwable e);

其中 code 指错误码,cause 指可能的原因(即 caused by… 后面所接的文字),extendedInformation 作为补充信息,直接附加在 caused by 这句话的后面。

(对于 error 级别也做了相同的扩展。)

为了确保各位贡献者能够了解到错误码机制下的 Logger 调用的要求,需要在 CI 进行一些检查,具体如下:

  1. 为了确保错误码机制在 Dubbo 项目中的覆盖,需要一个检测机制来确定对应的 Logger 是否正确调用。(即确定所有 error 和 warn 级别的 Logger 调用都是 ErrorTypeAwareLogger 的。但是 ErrorTypeAwareLogger 是派生于 Logger 类的,并且我们需要通过 Logger 接口的方法作为错误码 Logger 内部调用的基础。因此我们需要检查 warn 和 error 级别的日志方法中具体调用了哪个方法,是不是调用了本级方法而不是上级派生的日志方法?)
  2. 为了确保错误码对应的文档都存在,同样需要一个检测机制来确定对应的错误码的文档是否存在。

这便是这次介绍的 Dubbo 错误码 Logger 调用检查器(Dubbo Error Code Inspector,还是我写的 =_=)的作用。我将会用几篇文章介绍下它的工作流程。

错误码会出现在哪里

案例

为了确定所有错误码对应的文档都是存在的,我们需要拿到所有的错误码。

下面是错误码 Logger 调用的一些例子:

イ、org.apache.dubbo.common.DeprecatedMethodInvocationCounter [2]

1
2
3
4
5
6
7
8
9
10
11
12
13
14
15
16
17
/**
* Invoked by (modified) deprecated method.
*
* @param methodDefinition filled by annotation processor. (like 'org.apache.dubbo.common.URL.getServiceName()')
*/
public static void onDeprecatedMethodCalled(String methodDefinition) {
if (!hasThisMethodInvoked(methodDefinition)) {
LOGGER.warn(
DeprecatedMethodInvocationCounterConstants.ERROR_CODE,
DeprecatedMethodInvocationCounterConstants.POSSIBLE_CAUSE,
DeprecatedMethodInvocationCounterConstants.EXTENDED_MESSAGE,
DeprecatedMethodInvocationCounterConstants.LOGGER_MESSAGE_PREFIX + methodDefinition
);
}

increaseInvocationCount(methodDefinition);
}

对应常量类 org.apache.dubbo.common.constants.DeprecatedMethodInvocationCounterConstants [3]

1
2
3
4
5
6
7
8
9
10
11
12
13
14
15
16
17
18
package org.apache.dubbo.common.constants;

/**
* Constants of Deprecated Method Invocation Counter.
*/
public final class DeprecatedMethodInvocationCounterConstants {
private DeprecatedMethodInvocationCounterConstants() {
throw new UnsupportedOperationException("No instance of DeprecatedMethodInvocationCounterConstants for you! ");
}

public static final String ERROR_CODE = LoggerCodeConstants.COMMON_DEPRECATED_METHOD_INVOKED;

public static final String POSSIBLE_CAUSE = "invocation of deprecated method";

public static final String EXTENDED_MESSAGE = "";

public static final String LOGGER_MESSAGE_PREFIX = "Deprecated method invoked. The method is ";
}

ロ、org.apache.dubbo.registry.support.CacheableFailbackRegistry [4]

1
2
3
4
5
6
7
8
9
10
11
12
13
14
15
16
17
18
19
20
protected void evictURLCache(URL url) {
Map<String, ServiceAddressURL> oldURLs = stringUrls.remove(url);
try {
// ...
} catch (Exception e) {
// It seems that the most possible statement that causes exception is the 'schedule()' method.

// The executor that FrameworkExecutorRepository.nextScheduledExecutor() method returns
// is made by Executors.newSingleThreadScheduledExecutor().

// After observing the code of ScheduledThreadPoolExecutor.delayedExecute,
// it seems that it only throws RejectedExecutionException when the thread pool is shutdown.

// When? FrameworkExecutorRepository gets destroyed.

// 1-3: URL evicting failed.
logger.warn(REGISTRY_FAILED_URL_EVICTING, "thread pool getting destroyed", "",
"Failed to evict url for " + url.getServiceKey(), e);
}
}

ハ、org.apache.dubbo.registry.support.CacheableFailbackRegistry [5] (错误码还不归属于常量管理的时候的 ロ 的代码段):

1
2
3
4
5
6
7
8
9
10
11
12
protected void evictURLCache(URL url) {
Map<String, ServiceAddressURL> oldURLs = stringUrls.remove(url);
try {
// ...
} catch (Exception e) {
// ...

// 1-3: URL evicting failed.
logger.warn("1-3", "thread pool getting destroyed", "",
"Failed to evict url for " + url.getServiceKey(), e);
}
}

我们可以看到,错误码可能是直接量,也有可能在另一个常量文件里头(org.apache.dubbo.common.constants.LoggerCodeConstants)…… 理论上我们需要确定哪个是错误码的引用,然后到对应的常量文件去查询这个引用的错误码。

Java 编译器对常量所作的优化

听上去似乎挺复杂?其实不然,Java 编译器在遇到访问基本数据类型和 String 类型的常量(即用 static final 修饰)的时候,它会把这个值直接传过去。

例如将上述 イ 号例子(第一个 onDeprecatedMethodCalled 的例子)编译出来,再用 Java Decompiler 反编译后的效果:

Decompiled result of Dubbo Annotation Processor (R5.05.22-1)

可以看见,常量引用消失了,原来常量的引用的地方变成了常量的本身的值。

于是乎,我们并不用翻来覆去地找对应的错误码的常量文件了,只用确定这个文件的常量中哪个是错误码就行了。

class 文件中常量在哪里?

参考 我此前介绍注解处理的文章 可知,我们可以用 javap 工具确定 class 文件的结构。对于上述的 イ 号例子(第一个 onDeprecatedMethodCalled 的例子),对其进行 javap 分析如下:

1
2
3
4
5
6
7
8
9
10
11
12
13
14
15
16
17
18
19
20
21
22
public final class org.apache.dubbo.common.DeprecatedMethodInvocationCounter
minor version: 0
major version: 52
flags: (0x0031) ACC_PUBLIC, ACC_FINAL, ACC_SUPER
this_class: #41 // org/apache/dubbo/common/DeprecatedMethodInvocationCounter
super_class: #43 // java/lang/Object
interfaces: 0, fields: 2, methods: 7, attributes: 3
Constant pool:
#1 = Methodref #43.#88 // java/lang/Object."<init>":()V
#2 = Class #89 // java/lang/UnsupportedOperationException
#3 = String #90 // No instance of DeprecatedMethodInvocationCounter for you!
#4 = Methodref #2.#91 // java/lang/UnsupportedOperationException."<init>":(Ljava/lang/String;)V
#5 = Methodref #41.#92 // org/apache/dubbo/common/DeprecatedMethodInvocationCounter.hasThisMethodInvoked:(Ljava/lang/String;)Z
#6 = Fieldref #41.#93 // org/apache/dubbo/common/DeprecatedMethodInvocationCounter.LOGGER:Lorg/apache/dubbo/common/logger/ErrorTypeAwareLogger;
#7 = Class #94 // org/apache/dubbo/common/constants/DeprecatedMethodInvocationCounterConstants
#8 = String #95 // 0-99
#9 = String #96 // invocation of deprecated method
#10 = String #97 //
#11 = Class #98 // java/lang/StringBuilder
#12 = Methodref #11.#88 // java/lang/StringBuilder."<init>":()V

// ...

可以看见 #8 号常量就是我们所需要的错误码。

怎么通过 Java 提取出错误码?

Javassist 提供了操作 .class 文件的能力[6]。考虑到我们是直接读取 .class 文件中的常量池,所以使用 ClassFile 正合适。

打开 .class 文件

我们可以知道通过 Javassist 的 ClassFile 类可以操作 .class 文件,下面是用它打开 .class 文件的代码的一个例子 [7]

1
2
3
4
5
6
7
8
static ClassFile openClassFile(String classFilePath) {
try {
byte[] clsB = FileUtils.openFileAsByteArray(classFilePath);
return new ClassFile(new DataInputStream(new ByteArrayInputStream(clsB)));
} catch (IOException e) {
throw new RuntimeException(e);
}
}

获取常量池中的错误码

据 .class 文件的结构,所有的 “常量” 都存在常量池中。所以考虑在 Javassist 中拿到 ConstPool,即调用 ClassFile.getConstPool() 方法 [8],这样的话我们可以使用它来获取常量池的值。

根据上面对 .class 文件的分析,可以知道其在常量池的 #8 号位置,并且它是 String 类型,所以调用 ConstPool.getStringInfo(int) (其中 int 参数为 index,即常量池的索引) 可以获取对应 String 的内容。

但是,因为我们获取的是多个的 class 文件的错误码,所以我们不能直接 “固定” 一个索引去拿错误码。考虑到 Javassist 的 API 是没法直接通过除了索引以外的数据来获取的。所以我们需要通过其它方式确认一个 .class 文件中所有的错误码。

Javassist 的内部实现

我们可以仔细看下 Javassist 的有关获取 String 信息的代码:

Internals of Javassist #1, (R5.5.26-1)

可以知道它们全部都调用了一个通用方法 getItem() ,如下 :

1
2
3
4
ConstInfo getItem(int n)
{
return items.elementAt(n);
}

结合上述分析,我们可以知道 StringInfo 和 Utf8Info 都是 ConstInfo 的子类。对此我们可以先获取所有的常量池信息,然后筛选出合适的类型。

不论是 ConstInfo 还是 getItem 方法,都是包私有的,我们无法直接访问它。因此需要用到反射。

确定单个 .class 文件中所有的错误码

获取所有的常量池信息

根据上面的实现,可以通过一个计数循环(通过 ConstPool.getSize() 获取所有常量池信息的个数)来获取所有的常量池信息,如下 [7]

1
2
3
4
5
6
7
8
9
10
11
12
13
14
15
16
17
18
19
20
21
22
23
24
25
26
27
28
29
30
31
32
33
34
35
36
37
38
39
40
41
42
static List<Object> getConstPoolItems(ConstPool cp) {
List<Object> objects = new ArrayList<>(cp.getSize());

// 计数循环,获取所有的常量池信息。
for (int i = 0; i < cp.getSize(); i++) {
objects.add(getConstPoolItem(cp, i));
}

return objects;
}

/**
* 反射调用 ConstPool.getItem()。
* Calls ConstPool.getItem() method reflectively.
*
* @param cp The ConstPool object.
* @param index The index of items.
* @return The XXXInfo Object. Since it's invisible, return Object instead.
*/
static Object getConstPoolItem(ConstPool cp, int index) {

// 考虑到反射的性能损耗,这里用了个 Method 的缓存。
if (getItemMethodCache == null) {
Class<ConstPool> cpc = ConstPool.class;
Method getItemMethod;
try {
getItemMethod = cpc.getDeclaredMethod("getItem", int.class);
getItemMethod.setAccessible(true);

getItemMethodCache = getItemMethod;

} catch (NoSuchMethodException e) {
throw new RuntimeException("Javassist internal method changed.", e);
}
}

try {
return getItemMethodCache.invoke(cp, index);
} catch (IllegalAccessException | InvocationTargetException e) {
throw new RuntimeException("Javassist internal method changed.", e);
}
}

获取常量池中的错误码

只有 Utf8Info 才是实际承载字符串信息的常量池项目,如下:

1
2
3
4
5
6
7
class Utf8Info extends ConstInfo
{
static final int tag = 1;
String string;

// ...
}

考虑到上述情况,我们只用在常量池中找出所有的 Utf8Info 对象,并获取它对应的字符串就行。具体的代码如下 [7]

备注:

这里换了一种查找方式,并不是直接筛选出 Utf8Info,而是筛选出所有带 String string; 声明的 ConstInfo 子类的实例,之后获取 string 变量的内容。

(R5.10.30 补 - 其实当时是认为 StringInfo 类也存放了实际的字符串内容而这么做的…… 但实际上它只存放了个对应字符串的常量池索引……)

1
2
3
4
5
6
7
8
9
10
11
12
13
14
15
16
17
18
19
20
21
22
23
24
25
26
27
28
29
30
31
static List<String> getConstPoolStringItems(ConstPool cp) {
List<Object> objects = getConstPoolItems(cp);
List<String> stringItems = new ArrayList<>(cp.getSize());

for (Object item : objects) {

Field stringField;

if (item != null) {
stringField = getStringFieldInConstPoolItems(item);

if (stringField == null) {
continue;
}

Object fieldData;

try {
fieldData = stringField.get(item);
} catch (IllegalAccessException e) {
throw new RuntimeException("Javassist internal field changed.", e);
}

if (fieldData.getClass() == String.class) {
stringItems.add((String) fieldData);
}
}
}

return stringItems;
}

在此之后,根据错误码格式(见最上述引用)使用正则表达式筛选出来便可,代码如下 [9]

1
2
3
4
5
6
7
8
9
10
11
12
13
14
15
// In ErrorCodeExtractor.java: 
// Pattern ERROR_CODE_PATTERN = Pattern.compile("\\d+-\\d+");

@Override
public List<String> getErrorCodes(String classFilePath) {

ClassFile clsF = JavassistUtils.openClassFile(classFilePath);
ConstPool cp = clsF.getConstPool();

List<String> cpItems = JavassistUtils.getConstPoolStringItems(cp);

return cpItems.stream()
.filter(x -> ERROR_CODE_PATTERN.matcher(x).matches())
.collect(Collectors.toList());
}

其返回值便是所有的错误码。

当然,这只解决了获取全部错误码的问题。至于之后该怎么获得所有的 Logger 调用等等,还请看下回分解。


备注:

  1. 有关环境:

    イ、命令行 Maven 运行于 OpenJDK 19 环境下。

    ロ、对于 Dubbo 项目 IDEA JDK 配置为基于 OpenJDK 8 的 GraalVM 21.3.1 的 JDK。

    ハ、在编写错误码 Logger 调用自动检测程序时,使用的是 OpenJDK 19 版本,但调节了兼容性设置到 JDK 8。

    ニ、在 Dubbo CI 运行时使用 Azul OpenJDK 17。


引用和参考:

[1] Apache Dubbo - 错误码机制介绍

https://dubbo.apache.org/faq/intro

[2] Apache Dubbo Source Code - org.apache.dubbo.common.DeprecatedMethodInvocationCounter

https://github.com/apache/dubbo/blob/5ae875d951d354a2f2d3316fc08cab406a3e947e/dubbo-common/src/main/java/org/apache/dubbo/common/DeprecatedMethodInvocationCounter.java

[3] Apache Dubbo Source Code - org.apache.dubbo.common.constants.DeprecatedMethodInvocationCounterConstants

https://github.com/apache/dubbo/blob/5ae875d951d354a2f2d3316fc08cab406a3e947e/dubbo-common/src/main/java/org/apache/dubbo/common/constants/DeprecatedMethodInvocationCounterConstants.java

[4] Apache Dubbo Source Code - org.apache.dubbo.registry.support.CacheableFailbackRegistry

https://github.com/apache/dubbo/blob/3.3/dubbo-registry/dubbo-registry-api/src/main/java/org/apache/dubbo/registry/support/CacheableFailbackRegistry.java

[5] Apache Dubbo Source Code - org.apache.dubbo.registry.support.CacheableFailbackRegistry (error code was not managed in this version)

https://github.com/apache/dubbo/blob/7359a98fdd0ff274f50b0f6561d249d133d0f2fb/dubbo-registry/dubbo-registry-api/src/main/java/org/apache/dubbo/registry/support/CacheableFailbackRegistry.java

[6] Javassist Tutorial

http://www.javassist.org/tutorial/tutorial3.html#intro

[7] Apache Dubbo Error Code Inspector Source Code (in dubbo-test-tools) - org.apache.dubbo.errorcode.extractor.JavassistUtils

https://github.com/apache/dubbo-test-tools/blob/main/dubbo-error-code-inspector/src/main/java/org/apache/dubbo/errorcode/extractor/JavassistUtils.java

[8] Javassist API Docs - javassist.bytecode.ClassFile#getConstPool()

https://www.javassist.org/html/javassist/bytecode/ClassFile.html#getConstPool()

[9] Apache Dubbo Error Code Inspector Source Code (in dubbo-test-tools) - org.apache.dubbo.errorcode.extractor.JavassistConstantPoolErrorCodeExtractor

https://github.com/apache/dubbo-test-tools/blob/main/dubbo-error-code-inspector/src/main/java/org/apache/dubbo/errorcode/extractor/JavassistConstantPoolErrorCodeExtractor.java


[ TART - Dubbo (ECI) - T3 - R5 ] @HQ

(SNa - ECI, SNu - 1)

源码探索 | 从 Java 层面分析注解 (Annotation) 从编译到运行时发生了什么

写作动机

近期编写了一个基于注解的自动注入功能,于是就对 Java 的注解的工作原理产生了兴趣。下面是我对 Java 注解从编译时的行为到运行时提取注解的行为进行一定的(Java 层面上的)分析,愿能解释 Java 注解的工作原理。

全文约定

定义注解如下:

(运行时可见)

1
2
3
4
5
@Target({ElementType.FIELD, ElementType.TYPE})
@Retention(RetentionPolicy.RUNTIME)
public @interface TestRuntimeVisibleAnnotation {
String pathInResources();
}

1
2
3
4
5
6
7
8
@Target({ElementType.TYPE, ElementType.FIELD})
@Retention(RetentionPolicy.RUNTIME)

public @interface RuntimeVisibleAnnotation2 {
int data();

Class<?> theClass() default Object.class;
}

(出现于 class 文件)

1
2
3
4
@Target(ElementType.TYPE)
@Retention(RetentionPolicy.CLASS)
public @interface TestClassFileAnnotation {
}

(只能被编译器的 APT 处理)

1
2
3
4
@Target(ElementType.TYPE)
@Retention(RetentionPolicy.SOURCE)
public @interface TestSourceFileAnnotation {
}

我们可以知道 @TestRuntimeVisibleAnnotation 和 @RuntimeVisibleAnnotation2 是用来修饰 Field 且在运行时可见的注解,@TestClassFileAnnotation 是用来修饰类型且只能在 Class 文件中可见的注解(不能被运行时查到),@TestSourceFileAnnotation 是一个修饰类型并且只能被编译时的注解处理器 (APT) 处理,class 文件并不可见。

编译时发生的事情

注解一方

编译后的 class 文件成了啥样

我们使用 javap 工具来分析测试 TestRuntimeVisibleAnnotation 的 class 文件

1
javap -v TestRuntimeVisibleAnnotation.class

发现输出如下:

1
2
3
4
5
6
7
8
9
10
11
12
13
14
15
16
17
18
19
20
21
22
23
24
25
26
27
28
29
30
31
32
33
34
35
36
37
38
39
40
41
42
43
44
Compiled from "TestRuntimeVisibleAnnotation.java"
public interface TestRuntimeVisibleAnnotation extends java.lang.annotation.Annotation
minor version: 65535
major version: 59
flags: (0x2601) ACC_PUBLIC, ACC_INTERFACE, ACC_ABSTRACT, ACC_ANNOTATION
this_class: #1 // TestRuntimeVisibleAnnotation
super_class: #3 // java/lang/Object
interfaces: 1, fields: 0, methods: 1, attributes: 2
Constant pool:
#1 = Class #2 // TestRuntimeVisibleAnnotation
#2 = Utf8 TestRuntimeVisibleAnnotation
#3 = Class #4 // java/lang/Object
#4 = Utf8 java/lang/Object
#5 = Class #6 // java/lang/annotation/Annotation
#6 = Utf8 java/lang/annotation/Annotation
#7 = Utf8 pathInResources
#8 = Utf8 ()Ljava/lang/String;
#9 = Utf8 SourceFile
#10 = Utf8 TestRuntimeVisibleAnnotation.java
#11 = Utf8 RuntimeVisibleAnnotations
#12 = Utf8 Ljava/lang/annotation/Target;
#13 = Utf8 value
#14 = Utf8 Ljava/lang/annotation/ElementType;
#15 = Utf8 FIELD
#16 = Utf8 TYPE
#17 = Utf8 Ljava/lang/annotation/Retention;
#18 = Utf8 Ljava/lang/annotation/RetentionPolicy;
#19 = Utf8 RUNTIME
{
public abstract java.lang.String pathInResources();
descriptor: ()Ljava/lang/String;
flags: (0x0401) ACC_PUBLIC, ACC_ABSTRACT
}
SourceFile: "TestRuntimeVisibleAnnotation.java"
RuntimeVisibleAnnotations:
0: #12(#13=[e#14.#15,e#14.#16])
java.lang.annotation.Target(
value=[Ljava/lang/annotation/ElementType;.FIELD,Ljava/lang/annotation/ElementType;.TYPE]
)
1: #17(#13=e#18.#19)
java.lang.annotation.Retention(
value=Ljava/lang/annotation/RetentionPolicy;.RUNTIME
)

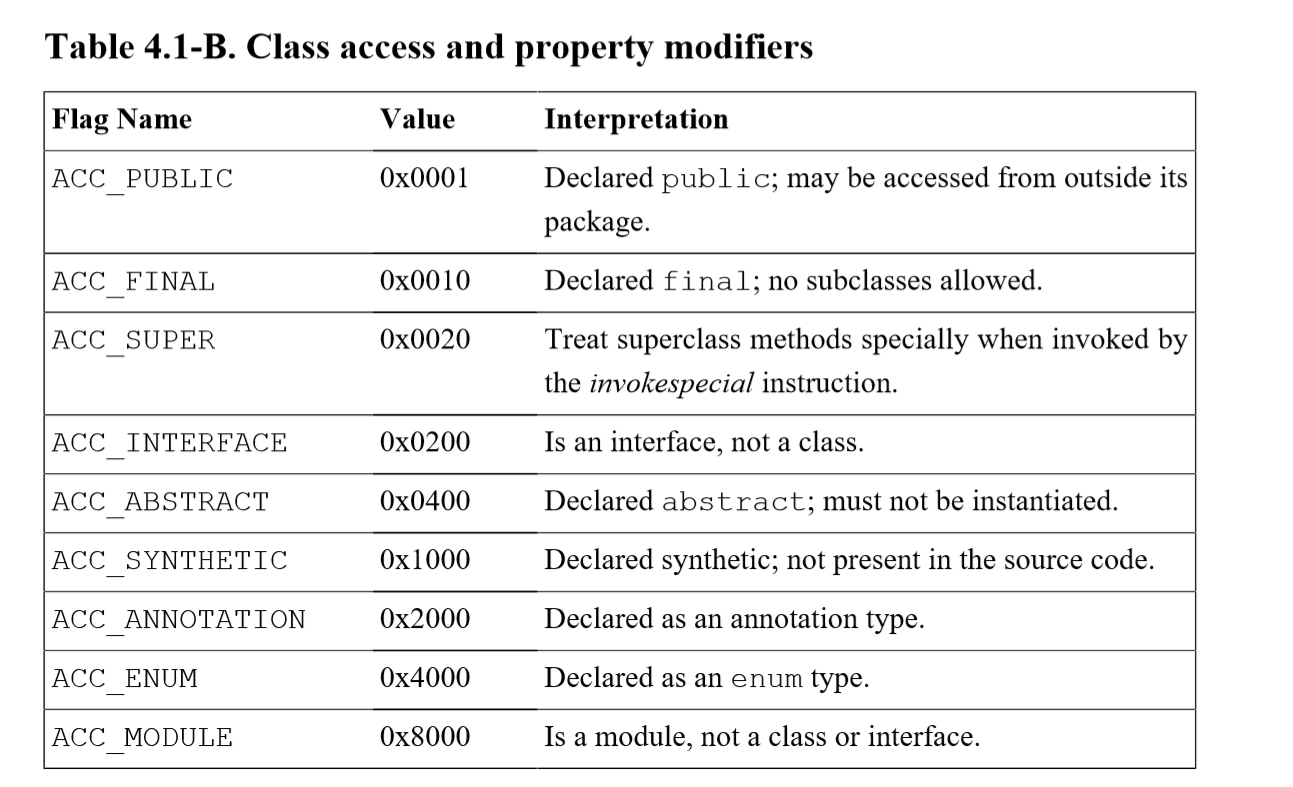
根据 Java 虚拟机规范 [1],class 文件的 access_flags 决定了这个类(或变量等)的性质以及访问的权限。

The "access_flags" part of Class File structure" section of The Java Virtual Machine Specification

根据 javap 的输出 中的 flags:

(0x2601) ACC_PUBLIC, ACC_INTERFACE, ACC_ABSTRACT, ACC_ANNOTATION

并查表可知:

ACC_PUBLIC: 表示 public 访问权限。

ACC_INTERFACE: 表示这是一个接口。

ACC_ABSTRACT: 这是一个特殊的标识,表示这是抽象的(根据规范,ACC_INTERFACE 存在时,这个也要存在)。

ACC_ANNOTAION: 表示这是一个注解对象。

可知注解的真实身份是一种特殊的接口。它是 java.lang.annotation.Annotation 的子接口。而 String pathInResources(); 最终也变成了这个 “接口” 的方法声明。

使用注解的一方

编译时发生的事情

下面是一个测试类:

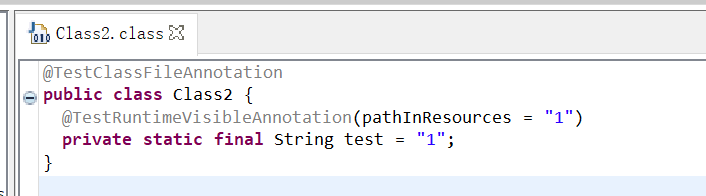
1
2
3
4
5
6
7
@TestClassFileAnnotation
@TestSourceFileAnnotation
public class Class2 {

@TestRuntimeVisibleAnnotation(pathInResources = "1")
private static final String test = "1";
}

对这个类进行编译,反编译的结果如下:

Decompiling Result

我们可以看到,@TestSourceFileAnnotation 消失了,这与这个注解的 @Retention 的值是相匹配的。

由这一过程可以看到,javac 并没有把这个注解写入 class 文件里头。打开 javac 写入 class 文件的代码 [2],并定位到 473 行的 writeJavaAnnotations() 的部分代码如下:

1
2
3
4
5
6
7
8
9
10
11
12
13
14
15
16
17
18
19
20
21
22
23
24
25
26
27
28
29
30
31
32
33
34
35
36
37
/**********************************************************************
* Writing Java-language annotations (aka metadata, attributes)
**********************************************************************/

/** Write Java-language annotations; return number of JVM
* attributes written (zero or one).
*/
int writeJavaAnnotations(List<Attribute.Compound> attrs) {
if (attrs.isEmpty()) return 0;
ListBuffer<Attribute.Compound> visibles = new ListBuffer<>();
ListBuffer<Attribute.Compound> invisibles = new ListBuffer<>();
for (Attribute.Compound a : attrs) {
// 根据 Retention 的属性决定写入到哪个属性表。
switch (types.getRetention(a)) {
case SOURCE: break;
case CLASS: invisibles.append(a); break;
case RUNTIME: visibles.append(a); break;
default: // /* fail soft */ throw new AssertionError(vis);
}
}

// 根据刚刚判定的结果写入到 class 文件的属性表
int attrCount = 0;
if (visibles.length() != 0) {
int attrIndex = writeAttr(names.RuntimeVisibleAnnotations);
databuf.appendChar(visibles.length());
for (Attribute.Compound a : visibles)
writeCompoundAttribute(a);
endAttr(attrIndex);
attrCount++;
}

if (invisibles.length() != 0) {
// ....
}
return attrCount;
}

编译之后的 class 文件变成了啥样(javap 分析)

我们使用 javap 工具来分析测试类 Class2 的 class 文件

1
javap -p -v Class2.class

发现输出如下:

1
2
3
4
5
6
7
8
9
10
11
12
13
14
15
16
17
18
19
20
21
22
23
24
25
26
27
28
29
30
31
32
33
34
35
36
37
38
39
40
41
42
43
44
45
46
47
48
49
50
51
52
53
54
55
56
57
58
59
60
61
62
63
64
65
Compiled from "Class2.java"

public class Class2
minor version: 65535
major version: 59
flags: (0x0021) ACC_PUBLIC, ACC_SUPER
this_class: #7 // Class2
super_class: #2 // java/lang/Object
interfaces: 0, fields: 1, methods: 1, attributes: 2
Constant pool:
#1 = Methodref #2.#3 // java/lang/Object."<init>":()V
#2 = Class #4 // java/lang/Object
#3 = NameAndType #5:#6 // "<init>":()V
#4 = Utf8 java/lang/Object
#5 = Utf8 <init>
#6 = Utf8 ()V
#7 = Class #8 // Class2
#8 = Utf8 Class2
#9 = Utf8 test
#10 = Utf8 Ljava/lang/String;
#11 = Utf8 ConstantValue
#12 = String #13 // 1
#13 = Utf8 1
#14 = Utf8 RuntimeVisibleAnnotations
#15 = Utf8 LTestRuntimeVisibleAnnotation;
#16 = Utf8 pathInResources
#17 = Utf8 Code
#18 = Utf8 LineNumberTable
#19 = Utf8 LocalVariableTable
#20 = Utf8 this
#21 = Utf8 LClass2;
#22 = Utf8 SourceFile
#23 = Utf8 Class2.java
#24 = Utf8 RuntimeInvisibleAnnotations
#25 = Utf8 LTestClassFileAnnotation;
{
private static final java.lang.String test;
descriptor: Ljava/lang/String;
flags: (0x001a) ACC_PRIVATE, ACC_STATIC, ACC_FINAL
ConstantValue: String 1
RuntimeVisibleAnnotations:
0: #15(#16=s#13)
TestRuntimeVisibleAnnotation(
pathInResources="1"
)

public Class2();
descriptor: ()V
flags: (0x0001) ACC_PUBLIC
Code:
stack=1, locals=1, args_size=1
0: aload_0
1: invokespecial #1 // Method java/lang/Object."<init>":()V
4: return
LineNumberTable:
line 4: 0
LocalVariableTable:
Start Length Slot Name Signature
0 5 0 this LClass2;
}
SourceFile: "Class2.java"
RuntimeInvisibleAnnotations:
0: #25()
TestClassFileAnnotation

根据输出,我们可以看到 Retention 指定成 RetentionPolicy.CLASS 的注解是写到了被修饰对象属性表的 RuntimeInvisibleAnnotations 项目中。而指定成 RetentionPolicy.RUNTIME 的注解写到了被修饰对象属性表的 RuntimeVisibleAnnotation 项目中。

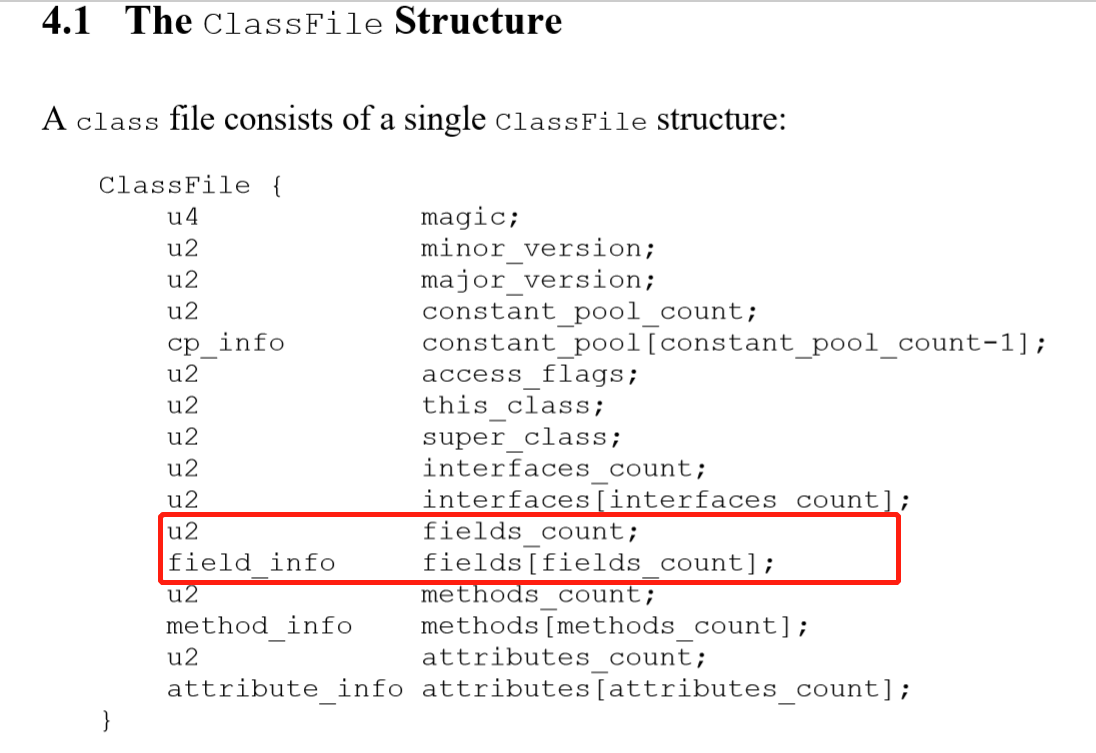
在 class 文件中表示对注解的引用(字节码的分析)

根据 Class 文件格式规范 [1]

"The ClassFile Structure" section of The Java Virtual Machine Specification

我们发现常量池之后出现的元素的声明的顺序分别是:类本身的有关信息、Field 的信息、方法的信息和修饰在这个类的属性。

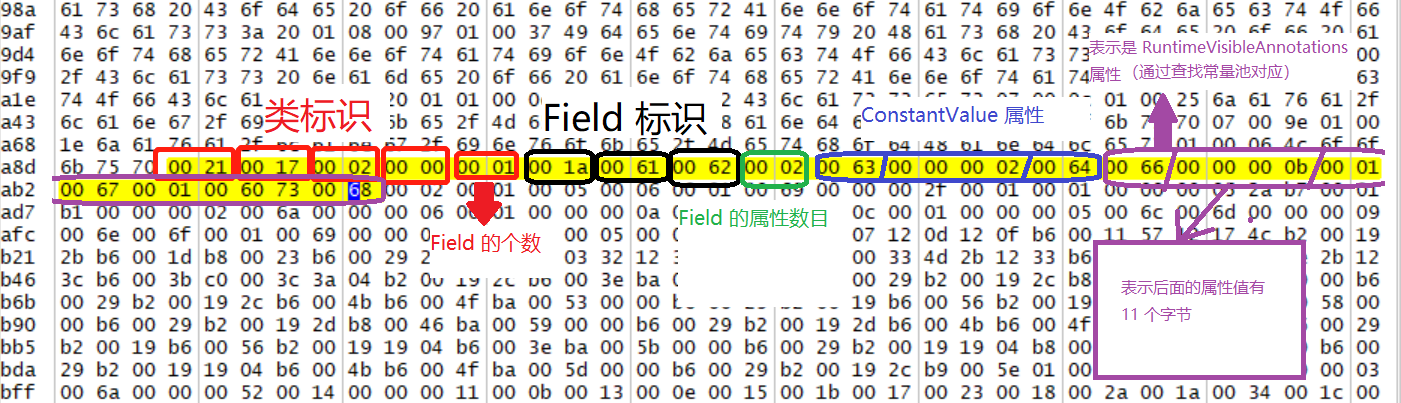
我们用十六进制编辑器打开 class 文件,按这个顺序进行人工解析:

Manual Interpreting of Class file

发现到 RuntimeVisibleAnnotations 属性的时候,它的属性值和 annotations 的值相同。
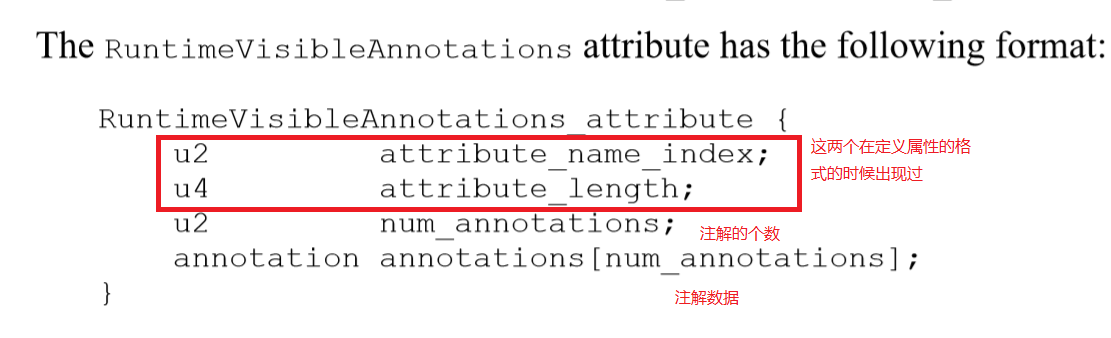
根据 Java 虚拟机规范 [1]:

The format of RuntimeVisibleAnnotations attribute of The Java Virtual Machine Specification

我们对这个属性进行进一步的拆分:

Manual Splitting of byte code

这决定了注解的属性的一部分。但是这需要常量池的配合才能获取完整的属性。

运行时

运行时类型探秘

我们修改一下测试类,探究一下获取到的注解对象的运行时类型:

1
2
3
4
5
6
7
8
9
10
11
12
13
14
15
16
17
18
19
20
21
22
23
24
25
26
27
28
29
30
31
32
33
34
35
36
37
38
39
40
41
42
43
44
45
46
47
48
49
50
51
52
53
54
55
56
57
58
import java.util.Arrays;

@TestRuntimeVisibleAnnotation (pathInResources = "class2")
@TestClassFileAnnotation
@TestSourceFileAnnotation
@RuntimeVisibleAnnotation2 (data = 1)
public class Class2 {

@TestRuntimeVisibleAnnotation(pathInResources = "123")
private static final String test = "1";

public static void main(String[] args) {
Class<Class2> klass = Class2.class;

System.out.println(Arrays.toString(klass.getDeclaredAnnotations()));

var annotationObjectOfField = klass.getDeclaredFields()[0].
getAnnotation(TestRuntimeVisibleAnnotation.class);

var annotationObjectOfClass = klass.getAnnotation(TestRuntimeVisibleAnnotation.class);

var anotherAnnotationObjectOfClass = klass.getAnnotation(RuntimeVisibleAnnotation2.class);

System.out.println("Hash Code of annotationObjectOfField: "
+ annotationObjectOfField.hashCode());

System.out.println("Identity Hash Code of annotationObjectOfField: "
+ System.identityHashCode(annotationObjectOfField));

System.out.println("Class name of annotationObjectOfField: "
+ annotationObjectOfField.getClass().getName());

System.out.println();

System.out.println("Hash Code of annotationObjectOfClass: "
+ annotationObjectOfClass.hashCode());

System.out.println("Identity Hash Code of annotationObjectOfClass: "
+ System.identityHashCode(annotationObjectOfClass));

System.out.println("Class name of annotationObjectOfClass: "
+ annotationObjectOfClass.getClass().getName());

System.out.println();

System.out.println("Hash Code of anotherAnnotationObjectOfClass: "
+ anotherAnnotationObjectOfClass.hashCode());

System.out.println("Identity Hash Code of anotherAnnotationObjectOfClass: "
+ System.identityHashCode(anotherAnnotationObjectOfClass));

System.out.println("Class name of anotherAnnotationObjectOfClass: "
+ anotherAnnotationObjectOfClass.getClass().getName());

System.out.println(annotationObjectOfField.pathInResources());
}
}


运行输出如下:

1
2
3
4
5
6
7
8
9
10
11
12
13
[@TestRuntimeVisibleAnnotation(pathInResources="class2"), @RuntimeVisibleAnnotation2(theClass=java.lang.Object.class, data=1)]
Hash Code of annotationObjectOfField: -995842473
Identity Hash Code of annotationObjectOfField: 1368884364
Class name of annotationObjectOfField: com.sun.proxy.$Proxy1

Hash Code of annotationObjectOfClass: 1806409183
Identity Hash Code of annotationObjectOfClass: 772777427
Class name of annotationObjectOfClass: com.sun.proxy.$Proxy1

Hash Code of anotherAnnotationObjectOfClass: 291781459
Identity Hash Code of anotherAnnotationObjectOfClass: 83954662
Class name of anotherAnnotationObjectOfClass: com.sun.proxy.$Proxy2
123

根据输出中的 Class name of XXX 的结果的 com.sun.proxy.$ProxyX 可以知道,在运行时当中获取的注解的实例,是由动态代理产生的。并且是一个注解一个对应一个类。

Java 标准库对注解的解析

Field 的 getAnnotation 方法

回到 “运行时类型探秘” 的测试类。

1
2
3
4
5
6
var annotationObjectOfField = klass.getDeclaredFields()[0].
getAnnotation(TestRuntimeVisibleAnnotation.class);

var annotationObjectOfClass = klass.getAnnotation(TestRuntimeVisibleAnnotation.class);

var anotherAnnotationObjectOfClass = klass.getAnnotation(RuntimeVisibleAnnotation2.class);

我们从 Field 类的 getAnnotation 方法 [3] 入手。

1
2
3
4
5
6
7
8
9
@Override
public <T extends Annotation> T getAnnotation(Class<T> annotationClass) {
Objects.requireNonNull(annotationClass);

// 从 declaredAnnotations 获取对应类的 Annotation 对象。
// 因为 get 方法返回的是 Annotation 即父接口对象。
// 所以将返回的 Annotation 对象转换成指定的注解类对象(相当于强转)。
return annotationClass.cast(declaredAnnotations().get(annotationClass));
}

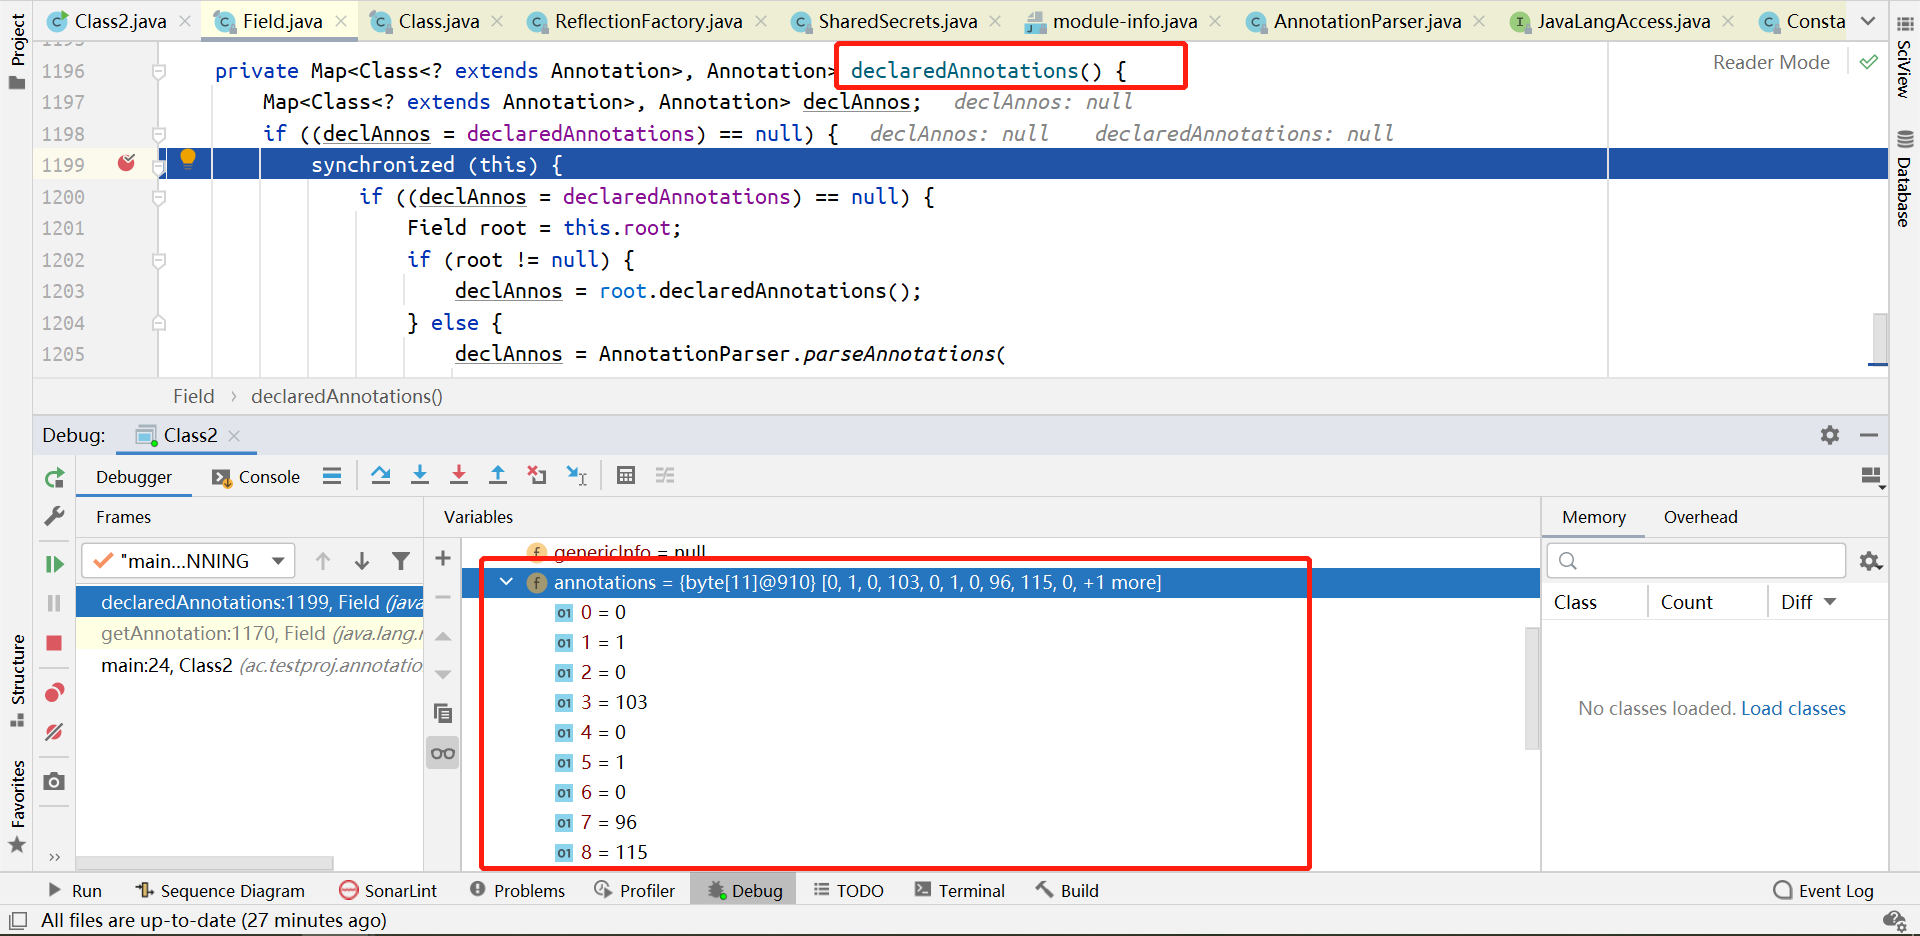
查找修饰 Field 的注解 - declaredAnnotations() 方法

对这个方法的分析如下:

1
2
3
4
5
6
7
8
9
10
11
12
13
14
15
16
17
18
19
20
21
22
23
24
25
26
27
28
29
30
31
private Map<Class<? extends Annotation>, Annotation> declaredAnnotations() {
Map<Class<? extends Annotation>, Annotation> declAnnos;

// 这用了 Double Checked Locking 的机制,用来检查是否有了缓存。
// 如果有了缓存,就不需要加锁创建缓存了。
// 这主要是为了防止多线程同时调用这一方法产生的混乱。
if ((declAnnos = declaredAnnotations) == null) {
synchronized (this) {
if ((declAnnos = declaredAnnotations) == null) {
// Class 的 getField 等方法返回的是经过复制的 Field 对象,
// 这是为了找到最初由运行时生成的 Field 对象
Field root = this.root;
if (root != null) {
declAnnos = root.declaredAnnotations();
} else {
// 但是,无论是什么情况,最终都要调用到这里。
// 这将注解的解析交给了 AnnotationParser 处理。
declAnnos = AnnotationParser.parseAnnotations(
annotations,
SharedSecrets.getJavaLangAccess()
.getConstantPool(getDeclaringClass()),
getDeclaringClass());
}

// 将获取到的注解缓存起来。
declaredAnnotations = declAnnos;
}
}
}
return declAnnos;
}

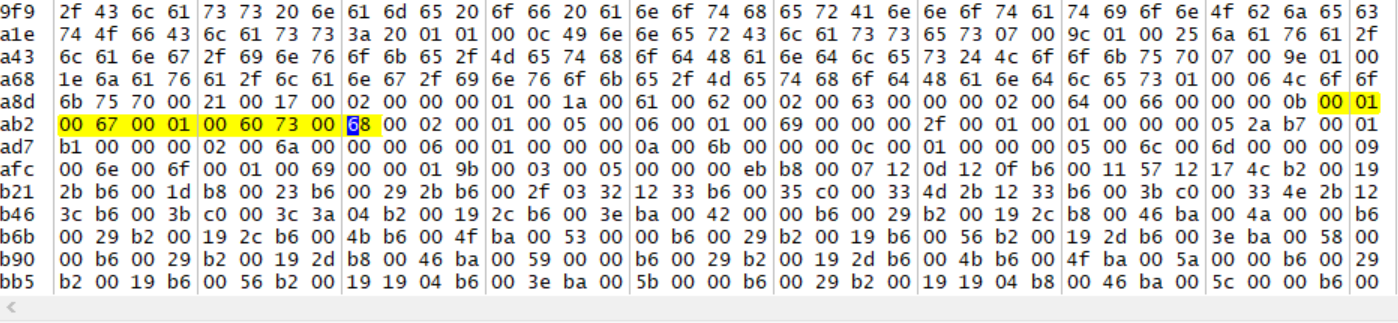
对 Field 中的 declaredAnnotation() 方法中的的语句打断点,进行 Debug。根据 Variables,我们获取到这个 Field 的 annotations 的值:

Value of "annotations"

将这个值抄写下来 (十六进制):

1
00 01 00 67 00 01 00 60 73 00 68

根据上文,这是 RuntimeVisibleAnnotations 的属性值。

Looking up the value

这表示了注解的数据。

分析注解数据的方法 - parseAnnotation 系列方法

parseAnnotations - 解析多个注解的入口方法

接下来分析 parseAnnotations 方法 [4]。

1
2
3
4
5
6
7
8
9
10
11
12
13
14
15
16
17
public static Map<Class<? extends Annotation>, Annotation> parseAnnotations(
byte[] rawAnnotations,
ConstantPool constPool,
Class<?> container) {
if (rawAnnotations == null)
return Collections.emptyMap();

try {
// 委派给 2 号方法。
return parseAnnotations2(rawAnnotations, constPool, container, null);
} catch(BufferUnderflowException e) {
throw new AnnotationFormatError("Unexpected end of annotations.");
} catch(IllegalArgumentException e) {
// Type mismatch in constant pool
throw new AnnotationFormatError(e);
}
}

解析多个注解的 2 号方法 - parseAnnotations2

1
2
3
4
5
6
7
8
9
10
11
12
13
14
15
16
17
18
19
20
21
22
23
24
25
26
27
28
// 2 号方法
private static Map<Class<? extends Annotation>, Annotation> parseAnnotations2(
byte[] rawAnnotations,
ConstantPool constPool,
Class<?> container,
Class<? extends Annotation>[] selectAnnotationClasses) {
Map<Class<? extends Annotation>, Annotation> result =
new LinkedHashMap<Class<? extends Annotation>, Annotation>();
ByteBuffer buf = ByteBuffer.wrap(rawAnnotations);
// 获取前两个字节 (确定多少个注解)
int numAnnotations = buf.getShort() & 0xFFFF;
for (int i = 0; i < numAnnotations; i++) {
// 委派给识别单个注解的 3 号方法。
Annotation a = parseAnnotation2(buf,
constPool,
container,
false, selectAnnotationClasses);
if (a != null) {
Class<? extends Annotation> klass = a.annotationType();
if (AnnotationType.getInstance(klass).retention() ==
RetentionPolicy.RUNTIME && result.put(klass, a) != null) {
throw new AnnotationFormatError(
"Duplicate annotation for class: "+klass+": " + a);
}
}
}
return result;
}

解析单个注解的 3 号方法 - parseAnnotation2

1
2
3
4
5
6
7
8
9
10
11
12
13
14
15
16
17
18
19
20
21
22
23
24
25
26
27
28
29
30
31
32
33
34
35
36
37
38
39
40
41
42
43
44
45
46
47
48
49
50
51
52
53
54
55
56
57
58
59
60
61
62
63
64
65
66
67
68
69
70
71
72
73
74
75
76
private static Annotation parseAnnotation2(ByteBuffer buf,
ConstantPool constPool,
Class<?> container,
boolean exceptionOnMissingAnnotationClass,
Class<? extends Annotation>[] selectAnnotationClasses)
{
// 获取注解的类型引用(常量池中注解类条目的序号)
int typeIndex = buf.getShort() & 0xFFFF;
Class<? extends Annotation> annotationClass = null;
String sig = "[unknown]";
try {
try {
// 获取常量池中注解类的对应类名
sig = constPool.getUTF8At(typeIndex);
// 将常量池表示转化为 Class 对象表示(并转化为 Annotation 的泛型)
annotationClass = (Class<? extends Annotation>)parseSig(sig, container);
} catch (IllegalArgumentException ex) {
// support obsolete early jsr175 format class files - 向后兼容
annotationClass = (Class<? extends Annotation>)constPool.getClassAt(typeIndex);
}
} catch (NoClassDefFoundError | TypeNotPresentException e) {
return null;
// 异常处理略
}

// selectAnnotationClasses 根据上面的调用是 null,故不执行。
if (selectAnnotationClasses != null &&
!contains(selectAnnotationClasses, annotationClass)) {
skipAnnotation(buf, false);
return null;
}

AnnotationType type = null;
try {
// 根据刚刚找到的注解类建立 AnnotationType 的实例(反射对象)。
// 对于这个方法的分析详见 “AnnotationType 反射对象的建立”。
// 这个类的主要作用是用来保存这个注解的共有信息的。
type = AnnotationType.getInstance(annotationClass);
} catch (IllegalArgumentException e) {
skipAnnotation(buf, false);
return null;
}

// 根据刚刚建立的 AnnotationType 的实例填充有关信息。
Map<String, Class<?>> memberTypes = type.memberTypes();

// 这会在生成一个 LinkedHashMap 的同时把默认值给填充进来。
Map<String, Object> memberValues =
new LinkedHashMap<String, Object>(type.memberDefaults());

// 获取键值对属性的个数
int numMembers = buf.getShort() & 0xFFFF;
for (int i = 0; i < numMembers; i++) {
int memberNameIndex = buf.getShort() & 0xFFFF;
// 从常量池当中取得属性名及其它的类型。
String memberName = constPool.getUTF8At(memberNameIndex);
Class<?> memberType = memberTypes.get(memberName);

if (memberType == null) {
// Member is no longer present in annotation type; ignore it
skipMemberValue(buf);
} else {
// 获取属性值。详见 “注解属性值的获取”
Object value = parseMemberValue(memberType, buf, constPool, container);
if (value instanceof AnnotationTypeMismatchExceptionProxy)
((AnnotationTypeMismatchExceptionProxy) value).
setMember(type.members().get(memberName));
memberValues.put(memberName, value);
}
}

// 将刚刚获取到的属性值组装成注解接口的代理对象
// 并包装为一个 Map 集合。
// 详见 “注解的运行时对象的生成”
return annotationForMap(annotationClass, memberValues);
}

注解属性值的获取 - AnnotationParser.parseMemberValue

1
2
3
4
5
6
7
8
9
10
11
12
13
14
15
16
17
18
19
20
21
22
23
24
25
26
27
28
29
30
31
32
public static Object parseMemberValue(Class<?> memberType,
ByteBuffer buf,
ConstantPool constPool,
Class<?> container) {
Object result = null;
int tag = buf.get();

// 根据对应 tag 进行不同类型属性值的获取。
// 但是基本上就是根据常量池和序号引用,并调用获取不同类别的实例进行操作。
// 具体的类型在 class 文件的存储办法可以参考 JVMS
switch(tag) {
case 'e':
// 调用了 Enum.valueOf(enumType, constName);
return parseEnumValue((Class<? extends Enum<?>>)memberType, buf, constPool, container);
case 'c':
result = parseClassValue(buf, constPool, container);
break;
case '@':
result = parseAnnotation(buf, constPool, container, true);
break;
case '[':
return parseArray(memberType, buf, constPool, container);
default:
result = parseConst(tag, buf, constPool);
}

if (!(result instanceof ExceptionProxy) &&
!memberType.isInstance(result))
result = new AnnotationTypeMismatchExceptionProxy(
result.getClass() + "[" + result + "]");
return result;
}

AnnotationType 反射对象的建立 [5]

根据上文,AnnotationType 的主要作用是用来保存这个注解的共有信息的。比如这个注解属性的键。

getInstance() 工厂方法

1
2
3
4
5
6
7
8
9
10
11
12
13
14
15
16
17
18
19
20
21
22
23
24
25
26
27
28
29
30
31
32
33
public static AnnotationType getInstance(
Class<? extends Annotation> annotationClass)
{
/*
下面两行相当于:
var result = annotationClass.getAnnotationType();

具体设计的原因详见备注 2
*/
JavaLangAccess jla = SharedSecrets.getJavaLangAccess();
// 根据对 Class 类的分析,AnnotationType 类是有缓存的。
AnnotationType result = jla.getAnnotationType(annotationClass); // volatile read

// 如果没缓存
if (result == null) {

// 先自己建一个
result = new AnnotationType(annotationClass);

// try to CAS the AnnotationType: null -> result
// CAS = Compare And Swap
// 其相当于 annotationClass.casAnnotationType(null, result);
// 这是通过 CAS 确保只有一个线程修改 annotationType 变量
if (!jla.casAnnotationType(annotationClass, null, result)) {
// somebody was quicker -> read it's result
// 如上述注释。如果有线程修改好了就用它的结果。
result = jla.getAnnotationType(annotationClass);
assert result != null;
}
}

return result;
}

AnnotationType 的私有构造器

1
2
3
4
5
6
7
8
9
10
11
12
13
14
15
16
17
18
19
20
21
22
23
24
25
26
27
28
29
30
31
32
33
34
35
36
37
38
39
40
41
42
43
44
45
46
47
48
49
50
51
52
53
54
55
56
57
58
59
60
61
62
63
64
65
66
67
68
69
70
private AnnotationType(final Class<? extends Annotation> annotationClass) {
if (!annotationClass.isAnnotation())
throw new IllegalArgumentException("Not an annotation type");

Method[] methods =
AccessController.doPrivileged(new PrivilegedAction<>() {
public Method[] run() {
// Initialize memberTypes and defaultValues
// 获取注解 “接口” 的 “方法” (其实就是 “键”)
return annotationClass.getDeclaredMethods();
}
});

memberTypes = new HashMap<>(methods.length+1, 1.0f);
memberDefaults = new HashMap<>(0);
members = new HashMap<>(methods.length+1, 1.0f);

for (Method method : methods) {
if (Modifier.isPublic(method.getModifiers()) &&
Modifier.isAbstract(method.getModifiers()) &&
!method.isSynthetic()) {
if (method.getParameterCount() != 0) {
throw new IllegalArgumentException(method + " has params");
}

// 获取键
String name = method.getName();

// 获取值的类型
Class<?> type = method.getReturnType();

// invocationHandlerReturnType 主要是将
// 基本数据类型的 class 对象转化包装类型的 class 对象
memberTypes.put(name, invocationHandlerReturnType(type));

// 将方法的名字和它对应的 Method 放到 members 表当中。
members.put(name, method);

// 获取默认值 (即 default 字句)
Object defaultValue = method.getDefaultValue();
if (defaultValue != null) {
// 放入默认值表
memberDefaults.put(name, defaultValue);
}
}
}

// Initialize retention, & inherited fields. Special treatment
// of the corresponding annotation types breaks infinite recursion.

// 处理元注解。
if (annotationClass != Retention.class &&
annotationClass != Inherited.class) {
JavaLangAccess jla = SharedSecrets.getJavaLangAccess();
Map<Class<? extends Annotation>, Annotation> metaAnnotations =
AnnotationParser.parseSelectAnnotations(
jla.getRawClassAnnotations(annotationClass),
jla.getConstantPool(annotationClass),
annotationClass,
Retention.class, Inherited.class
);
Retention ret = (Retention) metaAnnotations.get(Retention.class);
retention = (ret == null ? RetentionPolicy.CLASS : ret.value());
inherited = metaAnnotations.containsKey(Inherited.class);
}
else {
retention = RetentionPolicy.RUNTIME;
inherited = false;
}
}

注解的运行时对象(动态代理对象)的生成

根据上文对注解的分析,我们知道注解是一种特殊的接口。既然是接口,那么肯定就要有接口的实现。根据刚刚的分析,我们可以知道注解的运行时类型是一个动态代理对象。在分析注解的动态代理对象的具体行为之前,我们先来回顾一下动态代理。

动态代理的回顾

1
2
3
4
5
6
7
8
9
10
11
12
13
14
15
16
17
18
19
20
21
22
23
24
25
26
27
28
29
30
31
32
33
34
35
36
37
38
39
40
41
42
43
44
45
46
47
48
49
50
51
52
53
54
55
56
57
58
59
60
61
62
63
64
65
66
67
68
69
70
71
72
package ac.testproj.invoke;

import java.lang.reflect.InvocationHandler;
import java.lang.reflect.Method;
import java.lang.reflect.Proxy;

/**
* 封装动态代理对象的调用行为。
*
* @author Andy Cheung
*/
class MyInvocationHandler implements InvocationHandler {

@Override
public Object invoke(Object proxy, Method method, Object[] args) throws Throwable {

System.out.println("Invoking method: " + method.getName());

switch (method.getName()) {
case "hashCode":
return super.hashCode();
case "equals":
return super.equals(args[0]);
case "toString":
return super.toString();
default:
break;
}

if (method.getParameterCount() != 0) {
System.out.println("Received a number: " + args[0]);
return ((Integer) args[0]) + 1;
}

return null;
}
}

/**
* 对外提供调用方法的接口。
*
* @author Andy Cheung
*/
interface Action {
void act1();
void act2();
int act3(int val);
}

/**
* 测试类。
*
* @author Andy Cheung
*/
public class TestInvocationHandler {
public static void main(String[] args) {
// 让动态代理机制写入生成的中间 class 文件到硬盘。[6]
System.getProperties().put("jdk.proxy.ProxyGenerator.saveGeneratedFiles", "true");

// 创建一个基于 Action 接口的动态代理类。
// 参数:类加载器,要实现的接口,InvocationHandler 的实例
var proxy = (Action) Proxy.newProxyInstance(TestInvocationHandler.class.getClassLoader(),
new Class[] {Action.class}, new MyInvocationHandler());

proxy.act1();
proxy.act2();
System.out.println("Got Return in act3: " + proxy.act3(1));

System.out.println(proxy.getClass().getName());
}
}


输出如下:

1
2
3
4
5
6
Invoking method: act1
Invoking method: act2
Invoking method: act3
Received a number: 1
Got Return in act3: 2
ac.testproj.invoke.$Proxy0

运行后工作目录出现了生成的 class 文件:

Generated proxy class file [Fig. (Sect. Proxy) 1, 20210208]

经过反编译,发现生成的代码如下(节选部分且顺序经过调整):

1
2
3
4
5
6
7
8
9
10
11
12
13
14
15
16
17
18
19
20
21
22
23
24
25
26
27
28
29
30
31
32
33
34
35
36
37
38
39
40
41
42
43
44
45
46
47
48
49
50
51
52
53
54
55
56
57
58
59
60
61
62
package ac.testproj.invoke;

import java.lang.reflect.InvocationHandler;
import java.lang.reflect.Method;
import java.lang.reflect.Proxy;
import java.lang.reflect.UndeclaredThrowableException;

final class $Proxy0 extends Proxy implements Action {
private static Method m0;
private static Method m1;
private static Method m2;
private static Method m3;
private static Method m4;
private static Method m5;

static {
try {
m0 = Class.forName("java.lang.Object").getMethod("hashCode");
m1 = Class.forName("java.lang.Object")
.getMethod("equals", Class.forName("java.lang.Object"));
m2 = Class.forName("java.lang.Object").getMethod("toString");
m3 = Class.forName("ac.testproj.invoke.Action").getMethod("act3", Integer.TYPE);
m4 = Class.forName("ac.testproj.invoke.Action").getMethod("act2");
m5 = Class.forName("ac.testproj.invoke.Action").getMethod("act1");
} catch (NoSuchMethodException var2) {
throw new NoSuchMethodError(var2.getMessage());
} catch (ClassNotFoundException var3) {
throw new NoClassDefFoundError(var3.getMessage());
}
}

public $Proxy0(InvocationHandler param1) {
super(param1);
}

public final int act3(int var1) {
// super.h 就是我们指定的 InvocationHandler。
try {
return (Integer)super.h.invoke(this, m3, new Object[]{var1});
} catch (RuntimeException | Error var2) {
throw var2;
} catch (Throwable var3) {
throw new UndeclaredThrowableException(var3);
}
}

public final void act2() {
try {
super.h.invoke(this, m4, (Object[])null);
} catch (RuntimeException | Error var2) {
throw var2;
} catch (Throwable var3) {
throw new UndeclaredThrowableException(var3);
}
}

public final void act1() { /* ... */ }
public final int hashCode() { /* ... */ }
public final boolean equals(Object var1) { /* ... */ }
public final String toString() { /* ... */ }
}

根据生成的中间代码我们可以看出,动态代理实际上是在内存中(如果没有指定保存到硬盘上的话)生成一个中间代理类,这个代理类继承了 Proxy 类,并实现了我们指定的接口和 Serializable 接口(由 Proxy 类实现)。其将所有的方法(包括我们指定的接口以及 Object 类的方法)委托给传入的 InvocationHandler。由此证实 InvocationHandler 封装了动态代理类的行为。

注解的动态代理对象的建立

来到 annotationforMap 方法。

1
2
3
4
5
6
7
8
9
10
11
12
13
// 建立(刚刚识别的) Annotation 的动态代理对象。 
// 参数列表:(注解的 Class 对象,属性值)
public static Annotation annotationForMap(final Class<? extends Annotation> type,
final Map<String, Object> memberValues)
{
return AccessController.doPrivileged(new PrivilegedAction<Annotation>() {
public Annotation run() {
// 根据这个注解的类型和它的属性值生成了目标接口的一个代理类对象。
return (Annotation) Proxy.newProxyInstance(
type.getClassLoader(), new Class<?>[] { type },
new AnnotationInvocationHandler(type, memberValues));
}});
}

由此可见注解的方法调用的有关行为都交给了 AnnotationInvocationHandler 这一 InvocationHandler (行为封装)。

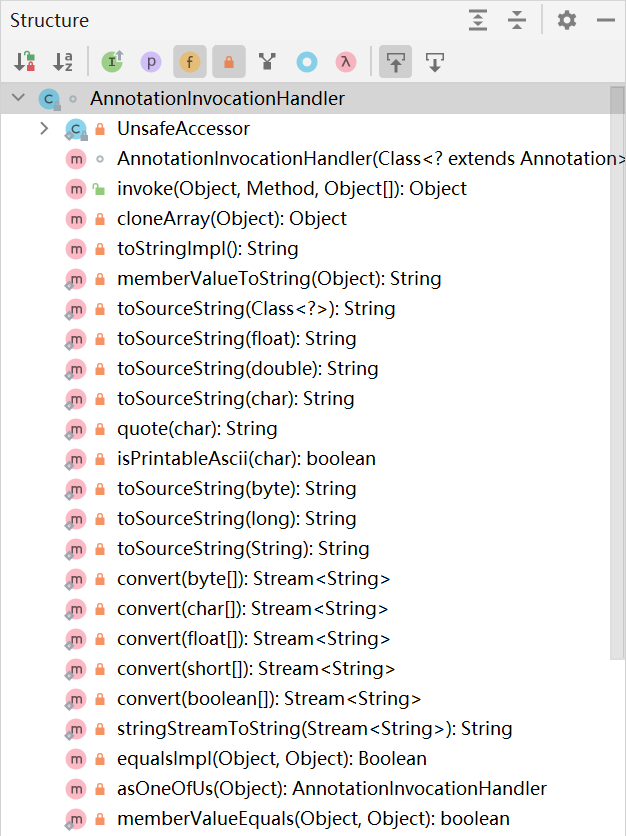
注解的动态代理对象行为的分析

根据上述信息,我们来到 AnnotationInvocationHandler 这个类 [7]。

首先来看下这个类的结构。

Structure of AnnotationInvocationHandler

我们可以看见有很多的方法(主要是 hashCode 等方法的实现)下面我们来逐一分析。

动态代理对象总的行为 - invoke 方法

1
2
3
4
5
6
7
8
9
10
11
12
13
14
15
16
17
18
19
20
21
22
23
24
25
26
27
28
29
30
31
32
33
34
35
36
37
38
39
40
41
42
43
44
45
public Object invoke(Object proxy, Method method, Object[] args) {
// 方法名和方法参数的个数
String member = method.getName();
int parameterCount = method.getParameterCount();

// Handle Object and Annotation methods - Object 定义的方法和 Annotation 的方法


// equals(Object)
if (parameterCount == 1 && member == "equals" &&
method.getParameterTypes()[0] == Object.class) {
return equalsImpl(proxy, args[0]);
}
if (parameterCount != 0) {
throw new AssertionError("Too many parameters for an annotation method");
}

if (member == "toString") {
// toString() 方法
return toStringImpl();
} else if (member == "hashCode") {
// hashCode() 方法
return hashCodeImpl();
} else if (member == "annotationType") {
// annotationType() 方法
return type;
}

// Handle annotation member accessors
// 我们定义的注解的属性
// 根据我们从 AnnotationParser 获取到的属性值,来返回最终的值。
Object result = memberValues.get(member);

if (result == null)
throw new IncompleteAnnotationException(type, member);

if (result instanceof ExceptionProxy)
throw ((ExceptionProxy) result).generateException();

// 为了防止数组被修改,先复制出来再返回
if (result.getClass().isArray() && Array.getLength(result) != 0)
result = cloneArray(result);

return result;
}

hashCode 方法的实现 - hashCodeImpl()

1
2
3
4
5
6
7
8
9
private int hashCodeImpl() {
int result = 0;
// 对每一个属性进行 hash 运算。
for (Map.Entry<String, Object> e : memberValues.entrySet()) {
result += (127 * e.getKey().hashCode()) ^
memberValueHashCode(e.getValue());
}
return result;
}

我们发现 result += … 的这句话的做法非常像 HashMap 的 hash 方法 [8]:

1
2
3
4
5
6
7
8
9
10
11
12
13
14
15
16
17
18
19
20
/**
* Computes key.hashCode() and spreads (XORs) higher bits of hash
* to lower. Because the table uses power-of-two masking, sets of
* hashes that vary only in bits above the current mask will
* always collide. (Among known examples are sets of Float keys
* holding consecutive whole numbers in small tables.) So we
* apply a transform that spreads the impact of higher bits
* downward. There is a tradeoff between speed, utility, and
* quality of bit-spreading. Because many common sets of hashes
* are already reasonably distributed (so don't benefit from
* spreading), and because we use trees to handle large sets of
* collisions in bins, we just XOR some shifted bits in the
* cheapest possible way to reduce systematic lossage, as well as
* to incorporate impact of the highest bits that would otherwise
* never be used in index calculations because of table bounds.
*/
static final int hash(Object key) {
int h;
return (key == null) ? 0 : (h = key.hashCode()) ^ (h >>> 16);
}

hash 方法主要是通过将高 16 位无符号右移 16 位跟低 16 位对齐,并对低 16 位进行异或操作(用异或的原因见备注 3)。这个操作的主要目的是减缓在某些情况下的 hash 冲突。

而注解的 hashCodeImpl 的意图是对键值对的 hash 值进行均匀混合。

equals 方法的实现 - equalsImpl(Object, Object)

1
2
3
4
5
6
7
8
9
10
11
12
13
14
15
16
17
18
19
20
21
22
23
24
25
26
27
28
29
30
31
32
33
34
35
36
// proxy = 代理对象自身
// o = 要比较的对象
private Boolean equalsImpl(Object proxy, Object o) {
if (o == proxy)
return true;

// 看 o 是不是这个注解“接口”的实例(是不是这个注释的代理对象)。
// 相当于 if (!(o instanceof <type 的类型>))
if (!type.isInstance(o))
return false;

// 属性值挨个比对,所有值相等才判 true
for (Method memberMethod : getMemberMethods()) {
String member = memberMethod.getName();
Object ourValue = memberValues.get(member);
Object hisValue = null;
// 判定是不是 AnnotationInvocationHandler 的实例,如果是的话,返回转换成它之后的对象
AnnotationInvocationHandler hisHandler = asOneOfUs(o);
if (hisHandler != null) {
hisValue = hisHandler.memberValues.get(member);
} else {
try {
hisValue = memberMethod.invoke(o);
} catch (InvocationTargetException e) {
return false;
} catch (IllegalAccessException e) {
throw new AssertionError(e);
}
}

// 根据数据类型进行相等比较
if (!memberValueEquals(ourValue, hisValue))
return false;
}
return true;
}

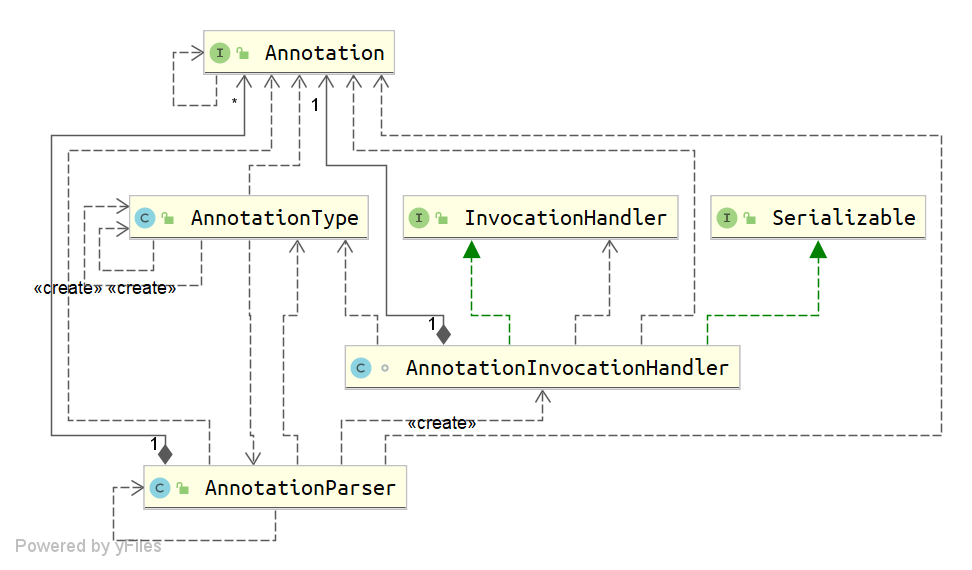
本文所提到有关注解的 Java 标准库的 UML 图

UML Diagram of annotation-related classes in API of Java

总结

  1. 注解本身在 class 文件上来看是一种特殊的接口,它的 “实现” 由动态代理和 AnnotationInvocationHandler 给予。
  2. 实际上使用注解的时候注解的有关信息是存在 class 文件被修饰元素部分的 Runtime(In)visibleAnnotations 的属性表里头的。
  3. 注解的解析逻辑在 sun.reflect.annotation.AnnotationParser 里头。
  4. 注解在运行时的对象是由动态代理产生的,其行为封装在 sun.reflect.annotation.AnnotationInvocationHandler 类里头,实现了被解析的注解这一 “接口” 。
  5. 注解本身在运行时里头也有个代表它本身,且用来存储共同信息的对象 sun.reflect.annotation.AnnotationType

备注:

  1. 使用 Oracle OpenJDK 15 编译,并启动了预览功能。

  2. SharedSecrets 以及一系列 Access 结尾的接口主要是为了能让内部实现包(即不是 java 和 javax 开头的那些包)能够不使用反射地访问到 java 和 javax 的包当中没有公开的方法(即包访问控制符的那些方法)。这些接口的实现比较分散,但是几乎都是在某个类的一个方法中调用 SharedSecrets.setXXXAccess (并传入一个匿名内部类)。比如 JavaLangAccess 的实现在 System 类的 setJavaLangAccess() 当中的一个匿名内部类。这解决了访问控制符的语法规定和内部实现类跨包访问的矛盾。

  3. 进行异或操作的主要原因是它产生的结果的概率是相等的。

    因为根据真值表:

    X Y 输出 (X ^ Y)
    1 0 1
    0 1 1
    1 1 0
    0 0 0

    P (X ^ Y = 1) = 2 / 4 = 1 / 2

    P (X ^ Y = 0) = 2 / 4 = 1 / 2

    两者相等。


引用和参考:

[1] The Java Virtual Machine Specification, Java SE 15 Edition

https://docs.oracle.com/javase/specs/jvms/se15/jvms15.pdf

[2] openJDK - com.sun.tools.javac.jvm.ClassWriter

https://github.com/openjdk/jdk15/blob/master/src/jdk.compiler/share/classes/com/sun/tools/javac/jvm/ClassWriter.java

[3] openJDK - java.lang.reflect.Field

https://github.com/openjdk/jdk15/blob/master/src/java.base/share/classes/java/lang/reflect/Field.java

[4] openJDK - sun.reflect.annotation.AnnotationParser

https://github.com/openjdk/jdk15/blob/master/src/java.base/share/classes/sun/reflect/annotation/AnnotationParser.java

[5] openJDK - sun.reflect.annotation.AnnotationType

https://github.com/openjdk/jdk15/blob/master/src/java.base/share/classes/sun/reflect/annotation/AnnotationType.java

[6] JDK动态代理生成的class文件保存到本地失败问题(sun.misc.ProxyGenerator.saveGeneratedFiles)

https://blog.csdn.net/zyq8514700/article/details/99892329

[7] openJDK - sun.reflect.annotation.AnnotationInvocationHandler

https://github.com/openjdk/jdk15/blob/master/src/java.base/share/classes/sun/reflect/annotation/AnnotationInvocationHandler.java

[8] openJDK - java.util.HashMap

https://github.com/openjdk/jdk15/blob/master/src/java.base/share/classes/java/util/HashMap.java


[ TART - JDK - T2 - Y21 (1) ] @HQ

Tomcat 下通过 JNDI 获取绑定的数据源对象的背后原理

重温一下我们在程序中使用 JNDI 配置的数据源的代码:

1
2
3
4
5
6
7
8
9
InitialContext ctx = null;
DataSource ds = null;
try {
ctx = new InitialContext();
ds = (DataSource) ctx.lookup("java:comp/env/jdbc/eduDS");
} catch (NamingException e) {
e.printStackTrace();
}
try (Connection c = ds.getConnection()) { ... }

JNDI 是 Java 的一个组件。它是一个通过名字取得对象的一个接口。Tomcat 提供了它的其中一种实现,下面我们不妨来简单分析下这其中的原理。

0. JNDI 的一些概念

在研究这一系列原理之前,我们先认识一下 JNDI 和它的几个对象。

JNDI 的概念与设计思想

JNDI 是 Java 命名与目录服务接口的英文简称。它主要是定义一批在 Java 的有关命名 / 目录服务的一系列接口(API / SPI)。JNDI 的结构设计与 JDBC 相仿,都是把对外接口 (API) 与具体实现 (SPI,在 JDBC 中叫驱动程序) 分离。

JNDI 在 JDK 中的位置

JNDI 的相关类和接口均位于 java.naming 模块的各个包中。其中我们主要操作的类在 javax.naming 这个包中。

JNDI 的几个常见对象

(a) javax.naming.Context 接口:在 JNDI 中表示一组绑定关系。

(b) javax.naming.InitialContext 类: JNDI 一系列操作的入口类,它更多的扮演着委托代理类的角色,把我们对这个类的调用“转发” 到实际指定的 Context 的实现类。

(c) javax.naming.Name 接口:代表命名服务中的“名字”。常见的实现类有 CompositeName

1. InitialContext 的工作流程

InitialContext 是 JNDI 的一系列的操作的入口类,下面我们先分析下这个类的原理。

① 调用构造器时,InitialContext 所做的事情(点开看大图):

② 调用 lookup 等 Context 接口定义的方法时,实际上发生的事情:

我们可以看出,这主要是先判断这是不是一个 URL Context,然后再根据情况调用不同的方法。这调用了 InitialContext 的 getURLScheme 方法。

这段代码的意思是:如果有地址符合类似于“XX:XX/XX” 这样的形式的话,那么这是一个 URL Context。前言中的 “java:comp/env/jdbc/eduDS” 显然符合这种形式。那么 NamingManager 的 getURLContext 会被调用。

我们不难看出它实际上是调用了 getURLObject 方法。

它通过获取 Context.URL_PKG_PREFIXES 所对应的系统属性的值,来查找对应的工厂类,并创建它的实例(也会缓存)。根据 NamingManger 的文档综合整理可知:

ResouceManager.getObjectInstance 方法会根据 Context.URL_PKG_PREFIXES 对应的系统属性的值挨个查找对应 scheme 的类。而其是一个以冒号分隔开的属性,用于指定要查找的包。

它查找的类符合这个规律:

{其中一个包名}.{scheme}.{scheme}URLContextFactory

而 java 这个 scheme 对应的正好就是

xx.java.javaURLContextFactory

又因 Context.URL_PKG_PREFIXES 对应的系统属性给指定成了

org.apache.naming

于是 org.apache.naming.java.javaURLContextFactory 就给匹配上了。

从上面的代码可以证实,InitialContext 更多地是充当了一个委托代理的角色,把方法调用 “转发” 给实际指定的 Context 实现。

2. Tomcat 对 InitialContext 的实际实现原理

根据上文可知,在 Tomcat 中,InitialContext 的实际操作对象是 org.apache.naming.java.javaURLContextFactory 类。下面是这个类的 getInitialContext 方法的源代码:

这段代码会使用 ContextBindings 来检查线程 / 类加载器是否绑定了一个 Context,来返回不同的 Context 实现类。下面是 ContextBindings.isClassLoaderBound 方法:

可以知道它实际上会检查这个类的 clBindings 集合是否含有这个线程的 ContextClassLoader 以及它的上级类加载器。根据对 clBindings (每个应用一个 ParallelWebAppClassLoader) 和 threadBindings (没有元素)的探究,我们发现可以看出它实际上返回的是 SelectorContext 对象。

InitialContextdefaultInitCtx (缓存的 Context)也证实了这一点。

ContextBindings 进行分析可知它是 Tomcat 中管理类选择器 / 线程与 Context 绑定关系的类。(篇幅有限,不放出它的源代码)。这个类主要使用 Map 来保存它们之间的关系。

SelectorContext.lookup 方法进行分析可以知道它实际上是调用了 getBoundContext 方法,源代码如下:

现在对于绑定的 Context 类型,就有了两种情况:

1. 直接在 InitialContext 对应绑定的 Context

Tomcat 会做特殊标识,并在 ContextBindings 中注册。这个情况主要的作用是保存直接在 InitialContext 中绑定的关系。因为和主题关系不大,故不讲。

2. URL Context 等非直接绑定到 InitialContext 的 Context

我们发现其实它是从 ContextBindings 中获取这个类加载器 / 线程对应的 Context。经查询,发现其对应的 Context 是 NamingContext。

根据 bindings 的提示,我们可以看到 “comp/env/…” 的树状结构了。这时候我们发现,每一个 bindings 的某一项的值就是一个 NamingEntry 的实例。NamingEntry 是一个数据类,代码就不放出来了。另外,如果是一个子 Context,那么这些都是 NamingContext 的实例。

我们还是分析一下这个类的 lookup 方法。首先 NamingContext.lookup 方法的 (String) 重载方法会先把 name 包装成 CompositeName 对象,之后调用 (Name) 的重载方法,之后再调用 (Name, boolean) 的重载方法,这一重载方法的部分源代码如下:

这个重载方法首先通过 CompositeName 的 size 方法判断是否有多个子节点,如果有多个子节点就使用递归把子节点所对应的 Context 给获取到。之后根据数据类 NamingEntry 的 type 属性,来返回不同的值。根据 NamingEntry 的定义,type 为 0 时,这代表 ENTRY (节点)。而我们的数据源就属于此类,因此直接返回对应 NamingEntry 的 value 属性,结束。


参考代码:

[1] openJDK

https://github.com/openjdk/jdk14

[2] tomcat (9.0.x)

https://github.com/apache/tomcat/tree/9.0.x


[ TART - TC - T1 - Y20 (1) ] @HQ